Biscoff Cheesecake Irresistibly Simple to Make
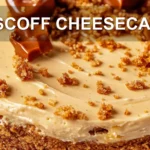
This Biscoff Cheesecake is a creamy and simple no bake dessert perfect for home baking. Enjoy this easy Biscoff Cheesecake recipe featuring cream cheese and biscuit cake base ideal for any occasion.
- Prep Time: 20 minutes
- Total Time: 4 hours 20 minutes
- Yield: Serves 12 1x
- Category: Dessert
- Method: Baked
- Cuisine: Family Food
Ingredients
Scale
- 200 g 7 oz Biscoff biscuits Crushed
- 80 g 3 oz Unsalted butter Melted
- 300 ml 1.25 cups Double cream
- 400 g 14 oz Full fat cream cheese
- 200 g 7 oz Biscoff spread
- 150 g 5 oz Biscoff spread Melted
- 50 g 2 oz Biscoff biscuits Crushed
Instructions
- Mix the crushed Biscoff biscuits with melted butter and press this mixture firmly into your cake tin, then chill it in the refrigerator.
- In a bowl, whisk together the double cream, full fat cream cheese, and Biscoff spread until the texture thickens to resemble ice cream.
- Take out the chilled base and spread the cheesecake filling over it evenly, smoothing the surface.
- Refrigerate the assembled cheesecake for at least 3 hours or preferably overnight for best results.
- Gently warm the Biscoff spread to a melted state without heating too much, then pour it over the chilled cheesecake and smooth out the topping carefully.
- Sprinkle the remaining crushed biscuits around the cheesecake’s edge and return it to the fridge for at least one more hour before slicing.
Notes
- Butter: I use unsalted butter for this and just melt it quickly in a mug in the microwave
- This is the equivalent of 3/4 stick of butter if you’re in the US
- Cream cheese: I like to use Philadelphia brand cream cheese for this recipe
- You can use other brands, but I find they are SLIGHTLY more difficult to combine
- Use full fat cream cheese and drain off any liquid before using
- Cream: Whip the cream straight from the fridge and whip enough so it holds its shape (texture of ice cream)
- If you’re in the US, you can use heavy cream as the equivalent to double cream
- Tin: Use a tin with either a springform (unclippable sides) or removable base (I like these Masterclass 7 inch Removable Base tins that I’ve had for years)
- Run a warmed dinner knife around the outside of the cheesecake, inside the tin, before removing it
- Remove the knife and wipe as you work your way around the cake
- Sit the tin on a tall glass and carefully press down so the sides of the tin can slip down lower than the cheesecake and you can easily remove it
Nutrition
- Calories: 445kcal
- Sugar: 12g
- Sodium: 112mg
- Fat: 38g
- Saturated Fat: 19g
- Unsaturated Fat: 1g + 7g
- Trans Fat: 0.2g
- Carbohydrates: 20g
- Fiber: 0.1g
- Protein: 5g
- Cholesterol: 76mg
Find it online: https://www.amgroyal.com/biscoff-cheesecake/