gluten free sourdough bread
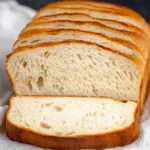
Craving homemade bread without gluten? Discover the perfect gluten free sourdough bread that is soft inside with a delightful crust. This easy-to-follow recipe brings traditional sourdough joy to everyone. Whether you’re gluten-intolerant or simply exploring new flavors, this is your go-to guide for a delicious loaf. Click to uncover the secret to this satisfying and simple creation!
- Prep Time: 15 minutes
- Cook Time: 60 minutes
- Total Time: 4 hours 15 minutes
- Yield: 1 loaf 1x
Ingredients
- 3 cups (420 g) all purpose gluten free flour blend (See Recipe Notes)
- 3 teaspoons xanthan gum, omit if your blend already contains it
- 9 tablespoons (68 g) tapioca starch/flour
- 2 tablespoons (25 g) granulated sugar
- 1 ½ teaspoons (9 g) kosher salt
- ¾ cup (165 g) gluten free wild yeast sourdough starter, fed within previous 12 hours (See Recipe Notes)
- 1 ½ cups (12 fluid ounces) warm milk, (about 95°F), plus more by the tablespoon
- 4 tablespoons (56 g) unsalted butter, at room temperature
- Melted butter, for brushing on top to help browning (optional)
Instructions
Step 1: Prepare the Sourdough Starter
Begin by feeding your sourdough starter a few hours before you plan to bake. This helps to ensure that it’s active and bubbly, ready to work its magic in your gluten free sourdough bread.
Step 2: Mix the Dry Ingredients
In a large mixing bowl, combine your gluten free all-purpose flour, salt, and any additional dry ingredients. Stir them together to ensure even distribution.
Step 3: Combine with the Starter
Add the active sourdough starter to the bowl with the dry ingredients. Slowly mix in the water, allowing the mixture to come together into a soft dough. Don’t worry if it looks a little loose; this is part of the charm of gluten free sourdough bread.
Step 4: Knead the Dough
Use your hands or a dough scraper to knead the dough lightly in the bowl. The texture should be slightly tacky but manageable, ensuring all ingredients are well combined.
Step 5: Let it Rise
Cover the bowl with a damp towel or plastic wrap and let the dough rise in a warm spot for several hours or until it has visibly grown in size. This step is crucial for developing flavor.
Step 6: Shape the Loaf
Once risen, gently deflate the dough and turn it out onto a floured surface. Shape it into a loaf or place it into a greased loaf pan, making sure to maintain the structure of the dough.
Step 7: Second Rise
Cover the shaped loaf again and let it rise for another hour. This final rise will give your gluten free sourdough bread its wonderful texture.
Step 8: Preheat the Oven
While the dough is rising, preheat your oven to the required temperature. A properly heated oven helps to achieve the perfect crust on your bread.
Step 9: Bake the Bread
Once preheated, carefully place the loaf in the oven. Bake until golden brown and the bread sounds hollow when tapped on the bottom, which indicates it is done.
Step 10: Cool Before Slicing
After baking, remove the bread from the oven and let it cool completely on a wire rack before slicing. This step allows the flavors and textures to set beautifully.
Notes
Tip 1: Choose Quality Flour
- Using a good gluten free all-purpose flour blend can greatly affect the outcome of your gluten free sourdough bread.
Tip 2: Proper Rising Conditions
- A warm, draft-free environment is ideal for rising. If your kitchen is cool, consider placing the dough in the oven with just the light on to create a cozy space.
Tip 3: Use a Food Scale
- For consistent results, measuring your flour by weight is more accurate than using volume alone.
Tip 4: Patience is Key
- Gluten free sourdough bread can take longer to rise than traditional bread, so give it that extra time for the best flavor.
Nutrition
- Serving Size: 1slice
- Calories: 265 kcal
- Sugar: 4g
- Sodium: 412mg
- Fat: 6g
- Saturated Fat: 4g
- Fiber: 2g
- Protein: 3g
Find it online: https://www.amgroyal.com/gluten-free-sourdough-bread/