Air Fryer Chicken Katsu Irresistible Crispy Dinner Your Family Will Love
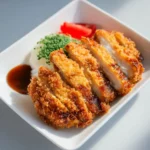
This Air Fryer Chicken Katsu is a crispy and tasty meal that’s perfect for an easy dinner or a quick weeknight dinner. The juicy chicken with a panko crust is a family dinner favorite, featuring crispy chicken katsu made in the panko chicken air fryer style.
- Prep Time: 15 minutes
- Cook Time: 15 minutes
- Total Time: 30 minutes
- Yield: Serves 4
- Category: Main Course
- Method: Air Fryer
- Cuisine: Japanese
- Diet: Standard
Ingredients
Scale
- 2 lbs chicken breast About 4 culets pounded to ½ inch thickness
- 1 tsp kosher salt
- 1 tsp black pepper
- 2 large eggs
- ½ cup flour
- ¼ cup water as needed to loosen wet batter
- ½ tsp kosher salt
- ½ tsp black pepper
- 1 tsp garlic powder
- 2 cups panko breadcrumbs
- neutral oil spray
- red pickled ginger for garnish
- Katsu Sauce try my homemade recipe
Instructions
- Cut the chicken breasts into cutlets if they are not already and pound them to a thickness of ½ inch. Season both sides of each piece with salt and pepper and let them rest for 15 minutes to dry brine.
- In a large bowl, whisk together the eggs, flour, water, salt, pepper, and garlic powder until the batter is a bit thinner than typical pancake batter.
- Pour the panko breadcrumbs into a separate dish ready for coating.
- Dip each chicken cutlet into the wet egg batter letting the excess drip off, then press the panko breadcrumbs firmly onto the chicken making sure the entire surface is covered without any gaps.
- Place the coated chicken pieces into the air fryer basket and lightly spray the tops with a neutral oil spray.
- Cook in the air fryer at 350F for 10 minutes until golden.
- Spray the top again lightly, flip the cutlets, spray the other side, then continue cooking at 350F for another 4 to 6 minutes until the crust is golden and the internal temperature is 165F.
- Serve the chicken katsu hot with rice, katsu sauce, and pickled ginger.
Notes
- chicken breast – my #1 tip is to pound or flatten the chicken into ½ inch thickness to ensure even cooking and to help the panko breadcrumbs crisp without burning
- If you don’t have a meat mallet or tenderizer, a heavy-bottomed pan works to pound the chicken
- panko breadcrumbs – panko are drier and flakier than regular breadcrumbs which absorb less oil and create a lighter, crunchier crust
- Press the panko firmly on the chicken and let the coated pieces rest 10 to 15 minutes before cooking so the coating adheres well
- neutral cooking oil spray – avocado oil cooking spray is recommended but any neutral oil spray works
- Spraying lightly and evenly with oil is key to achieving a crispy panko crust
- Storage – Keep leftovers in an airtight container in the fridge for 3 to 4 days
- Crispiness will diminish but can be somewhat restored by reheating in the air fryer at 350F for 3 to 5 minutes
Nutrition
- Serving Size: 1 serving
- Calories: 438kcal
- Sugar: 2g
- Sodium: 1356mg
- Fat: 8g
- Saturated Fat: 2g
- Unsaturated Fat: 2g + 2g
- Trans Fat: 0.03g
- Carbohydrates: 35g
- Fiber: 2g
- Protein: 54g
- Cholesterol: 145mg
Find it online: https://www.amgroyal.com/air-fryer-chicken-katsu/