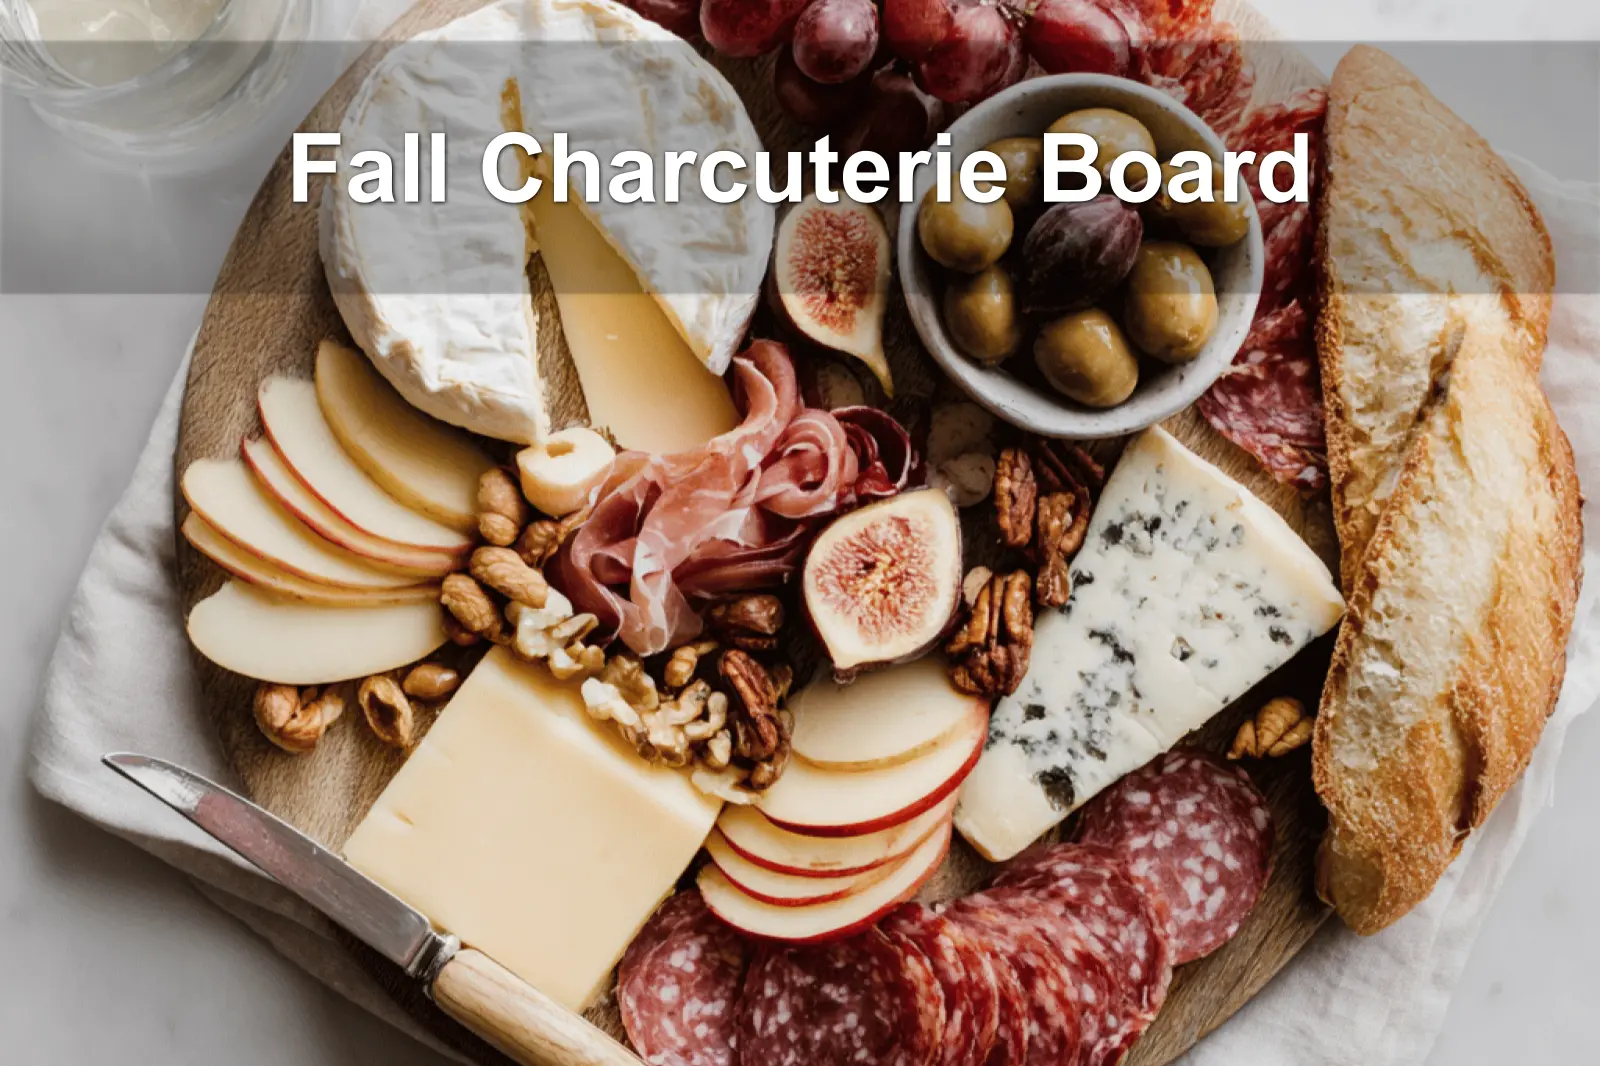
There’s something magical about the first crisp October evening when you realize it’s time to trade summer’s bright tomatoes for autumn’s golden bounty. A fall charcuterie board captures that cozy shift perfectly warm spices, rich cheeses, and those deep jewel-toned fruits that make your kitchen smell like a hug. It’s ridiculously simple but looks like you spent hours planning.
Think of it as autumn on a wooden board. We’re talking creamy brie paired with spiced pear butter, candied walnuts that crunch just right, and maybe some dried figs if you’re feeling fancy. But honestly? Half the magic comes from what’s already in your pantry. Full details in the blog!
I’ve been arranging boards since college potlucks, but this version reminds me of those first dinner parties where everything felt grown-up and intentional. There’s an art to balancing sweet and savory without overthinking it. I tested every combination here trust me, the maple drizzle changes everything.
Why This Fall Charcuterie Board Will Become Your Go-To
There’s something deeply satisfying about arranging a fall charcuterie board that feels both effortless and impressive. Unlike complicated recipes that demand precise timing, this is pure assembly but with autumn’s rich flavors doing all the heavy lifting. The combination of creamy brie, salty prosciutto, and sweet figs creates those perfect little bites that make everyone linger around the kitchen island just a bit longer.
What I love most is how forgiving it is. Forgot to slice the pears? No problem tear them into rustic chunks. Blue cheese a little too pungent for the kids? They’ll gravitate toward the cheddar and grapes. It’s the kind of spread that adapts to your family’s tastes while still feeling special enough for company.
| Why You’ll Love This Board | The Magic |
|---|---|
| No cooking required | 30 minutes of assembly, zero stress |
| Feeds a crowd | 8 generous servings from simple ingredients |
| Seasonal flavors | Figs, pears, and pumpkin seeds feel perfectly autumn |
| Visual impact | Looks like you hired a caterer |
The Key Players: Ingredients That Make It Sing
Every great charcuterie board starts with quality ingredients, but you don’t need to break the bank. The secret is balancing textures and flavors something creamy (hello, brie), something sharp (that gorgeous blue cheese), something sweet (those halved figs), and something crunchy (roasted pumpkin seeds for the win).
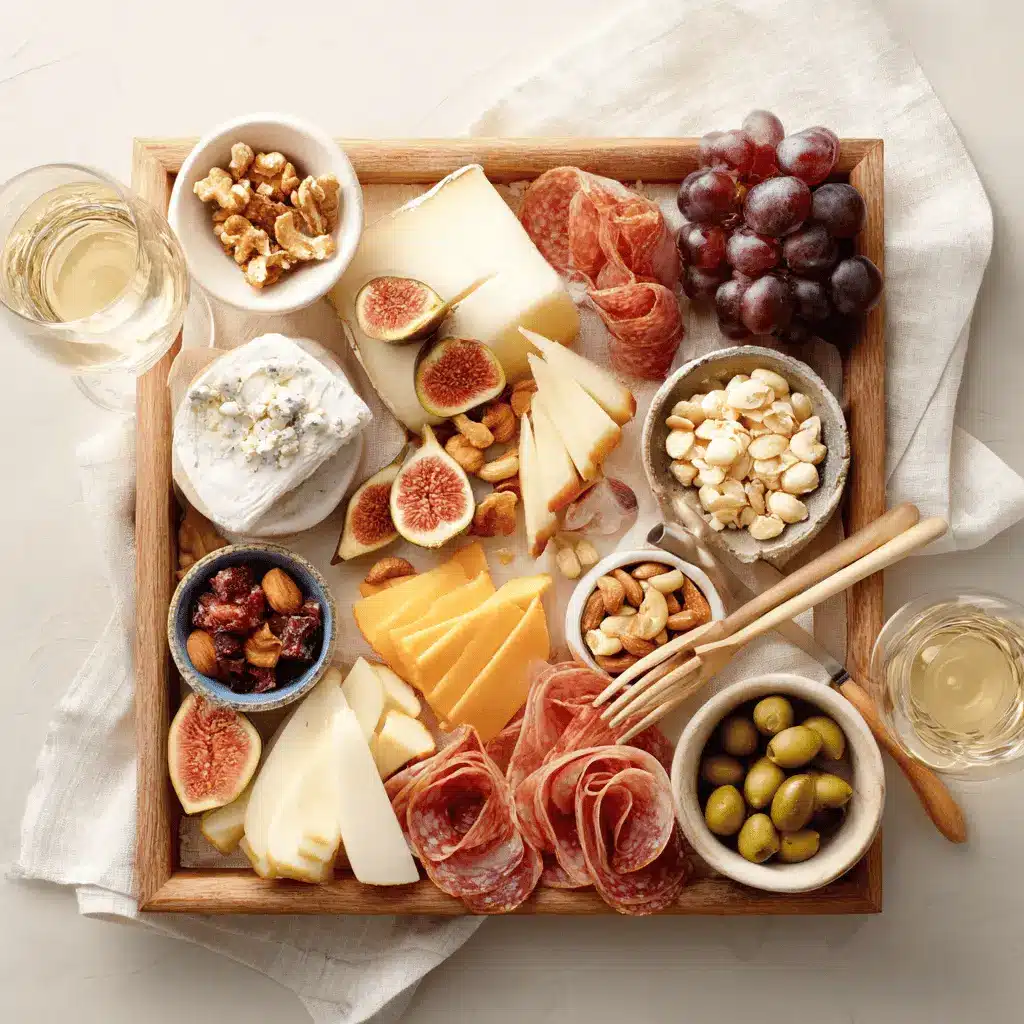
I always tell friends to think in color families when shopping. The deep burgundy of dried cranberries, golden honey drizzles, and rich purple grapes create that cozy autumn palette without any extra effort. Pro tip: Let your cheeses come to room temperature for about an hour before serving it transforms their flavor completely.
- The cheese trio: Brie for creaminess, sharp cheddar for familiar comfort, gouda for that slight sweetness, and blue cheese for the adventurous
- Seasonal fruits: Fresh pears and apples balance the richness, while figs and cranberries add concentrated sweetness
- Textural elements: Mixed nuts and pumpkin seeds provide that satisfying crunch between creamy bites
Your Step-by-Step Assembly Guide
Building a fall charcuterie board is like arranging a beautiful, edible puzzle. Start with your largest pieces the cheese wheel and small bowls for honey and jam then fill in the gaps with everything else. I learned this from watching my grandmother arrange her holiday spreads: anchors first, details second.
The magic happens in the layering. Fold your prosciutto into little roses, fan those apple slices, and cluster grapes in natural-looking bunches. Don’t overthink the placement some of the most beautiful boards have that slightly imperfect, lived-in look that says “come, grab a bite and stay awhile.”
| Assembly Order | What to Do | Why It Matters |
|---|---|---|
| 1. Anchors | Place cheeses and small bowls | Creates structure and balance |
| 2. Meats | Fold and arrange near complementary cheeses | Builds visual height and easy grabbing |
| 3. Fruits | Fill gaps with sliced and whole fruits | Adds color and freshness |
| 4. Crackers & Bread | Fan or stack around edges | Provides vehicles for toppings |
| 5. Final Details | Scatter nuts, add honey drizzle | Completes the abundant look |
Quick Fixes When Things Don’t Go as Planned
Even the most casual boards sometimes need a little troubleshooting. If your brie is too cold and hard to spread, give it a quick 10-second zap in the microwave just enough to soften the edges. Apple slices turning brown? A quick toss with lemon juice (or even apple cider) keeps them looking fresh and adds a subtle tang.
Running short on space? Use small bowls to contain wet ingredients like olives or honey, and don’t be afraid to create height by layering crackers or leaning baguette slices against the cheese wheel.
Make It Your Own: Simple Swaps and Tweaks
The beauty of a fall charcuterie board is how easily it adapts to what’s in your fridge or what your family actually enjoys. Not a blue cheese household? Swap in some aged white cheddar or even a mild goat cheese with herbs. Kids turning their noses up at figs? Fresh grapes and apple slices will disappear just as quickly.
I love adding personal touches that reflect our family’s tastes sometimes it’s a small bowl of my grandmother’s spiced walnuts, or a jar of local honey from the farmers market. These little details make the board feel like yours rather than something copied from a magazine.
| Original Ingredient | Easy Swaps | Flavor Impact |
|---|---|---|
| Blue cheese | Goat cheese, aged white cheddar | Milder, kid-friendly |
| Figs | Fresh grapes, dried apricots | More familiar sweetness |
| Prosciutto | Turkey or ham slices | Less salty, budget-friendly |
| Fig jam | Apple butter, pear preserves | More autumn-specific flavors |
| Pumpkin seeds | Toasted pecans, candied walnuts | Sweeter, more indulgent |
Serving and Storage: Keeping It Fresh
The best part about serving a charcuterie board is watching people naturally gather around it there’s something about finger foods that makes conversation flow easier. Set out small plates and plenty of napkins, and don’t forget cheese knives for each type of cheese (trust me, nobody wants blue cheese flavor on their mild brie).
For storing leftovers, wrap each cheese type separately in wax paper or plastic wrap, and refrigerate within two hours. The fruits and nuts usually disappear first, but leftover meats and cheeses make excellent sandwiches or omelets for the next few days.
| Storage Item | Method | Timeline |
|---|---|---|
| Soft cheeses | Wrap in wax paper, refrigerateExpert Insight: Crafting the Perfect Fall Charcuterie BoardA well-balanced fall charcuterie board combines seasonal flavors and varied textures to delight the palate. Incorporating items like aged cheeses, cured meats, roasted nuts, and fresh or dried fruits not only enhances taste but also creates visual appeal that invites sharing and savoring in any autumn gathering. For more delicious recipes and cooking inspiration, follow me on Facebook, Pinterest and Reddit!The Journey to My Perfect Fall Charcuterie BoardIt took several weekends and a few amusing mix-ups before I felt this fall charcuterie board truly captured the season’s warmth. Balancing sweet, savory, and crunchy took patience, but all those little lessons turned these boards into a rich, inviting spread our family now gathers around each autumn evening. FAQs ( Fall Charcuterie Board )What should I put on a fall charcuterie board?A perfect fall charcuterie board includes seasonal favorites like aged cheddar, goat cheese, and brie paired with autumn-inspired meats such as salami and prosciutto. Add fresh apples, pears, dried cranberries, candied pecans, and figs for that cozy fall flavor. Don’t forget fall crackers, honey, and perhaps some pumpkin butter or apple butter for extra seasonal charm. The key is balancing sweet and savory elements that capture the essence of autumn. How far in advance can I prepare a fall charcuterie board?You can prepare most components of your fall charcuterie board 2-3 hours ahead of time, but it’s best assembled 30-60 minutes before serving for optimal freshness. Cheese should be brought to room temperature about 30 minutes before serving for the best flavor and texture. Cut fruits like apples and pears just before serving to prevent browning, or brush them with lemon juice if preparing earlier. Pre-portioned nuts, crackers, and cured meats can be prepped the day before and stored properly. What fall cheeses work best for a charcuterie board?The best fall cheeses include rich, warming varieties like aged white cheddar, creamy brie, tangy goat cheese, and nutty gruyere. Consider adding a bold blue cheese for adventurous guests and maybe some smoked gouda for that cozy autumn feel. Aim for 3-5 different cheeses with varying textures – soft, semi-hard, and hard – to create an interesting variety. These cheeses pair beautifully with fall fruits and complement the season’s robust flavors perfectly. How much food do I need for a fall charcuterie board per person?Plan for about 3-4 ounces of cheese and 2-3 ounces of cured meats per person if the charcuterie board is an appetizer. For a main course or party centerpiece, increase to 6-8 ounces of cheese and 4-5 ounces of meat per person. Don’t forget to account for crackers, fruits, nuts, and spreads – roughly 2-3 crackers, a small handful of nuts, and some fruit per person. It’s always better to have a little extra than to run short, especially during fall gatherings! What fall fruits are best for a charcuterie board?The most delicious fall fruits for charcuterie boards include crisp apples like Honeycrisp or Gala, sweet pears such as Bosc or Anjou, and fresh figs when available. Dried fruits like cranberries, apricots, and dates add lovely chewy textures and concentrated sweetness. Grapes are also fantastic year-round additions that pair beautifully with cheese and meats. These fruits not only taste amazing but also provide gorgeous autumn colors that make your board Instagram-worthy! |
Fall Charcuterie Board
Create a cozy and inviting fall charcuterie board featuring a delightful mix of cheeses, meats, fruits, nuts, and sweet touches perfect for any appetizer or gathering.
- Prep Time: 30 minutes
- Cook Time: 0 minutes
- Total Time: 30 minutes
- Yield: 8 servings 1x
- Category: Appetizer
- Cuisine: American
Ingredients
- 6 oz brie cheese wheel
- 6 oz sharp cheddar sliced
- 4 oz gouda sliced
- 4 oz blue cheese crumbled
- 4 oz prosciutto
- 4 oz salami
- 3 oz chorizo slices
- 1 apple thinly sliced
- 1 pear thinly sliced
- ½ cup red grapes
- ½ cup figs halved
- ¼ cup dried cranberries
- ½ cup mixed nuts walnuts pecans almonds
- ¼ cup marinated olives
- ¼ cup roasted pumpkin seeds
- 2 tbsp honey
- 2 tbsp fig jam
- 1 small baguette sliced
- 1 cup assorted crackers
Instructions
- Gather & prep (the easiest step — set yourself up to win) Clear a big workspace and lay out your board or platter. Pull cheeses out of the fridge 30–60 minutes before you plan to serve so they soften and show their full flavor. Open jars (honey jam) slice the baguette and get small bowls/ramekins ready for wet items (olives spreads). Place knives spoons tongs and napkins within easy reach. Pro tip: Letting cheese come to room temperature makes it taste brighter and easier to slice — plan ahead so you don’t rush this.
- Prep the cheeses (simple cuts pretty presentation) Brie: leave the wheel whole or cut into a wedge score the top if you’ll warm it later. Place on the board with a small knife. Hard cheeses (cheddar gouda): slice some into thin pieces and cut some into chunks to encourage casual grabbing. Blue cheese: crumble into a small pile or place in a tiny dish if it’s very soft. Arrange cheeses in separate “anchor” spots across the board so they create visual balance. Pro tip: Offer different cheese textures (soft semi-soft hard tangy) and place knives so guests don’t cross-contaminate flavors.
- Prep the meats (fold roll and pile for texture) Prosciutto: drape into loose folds or make little “roses” by folding slices lengthwise and rolling. Salami: stack and fold or roll into cones so they stand up on the board. Chorizo or cured sausages: layer in small overlapping piles. Aim for small groupings (3–6 pieces each) rather than a big flat sheet of meat — it looks more artisanal. Pro tip: Rolling or folding meats adds height and makes them easier to pick up without needing a fork.
- Place your anchors first (cheeses & small bowls) Put your largest items down first: cheeses and any bowls/ramekins (honey jam olives). Space anchors across the board so there’s no overcrowded corner. Leave pathways between anchors — these gaps will be for fruits nuts and crackers.
- Add the meats next (build around cheese) Tuck meat groupings near cheeses that pair well (e.g. prosciutto by brie chorizo near sharper cheddar). Keep oily or strongly flavored meats slightly separate from delicate crackers or mild cheeses. Use the natural shape of the board — if it’s long stagger items if it’s round work in a circular flow.
- Layer fruits nuts and sweet bites (fill the gaps) Cluster grapes in small bunches rather than scattering single grapes. Fan apple and pear slices tucking them into crevices toss briefly with a squeeze of lemon if you’re prepping ahead to prevent browning. Halve figs and nestle them near cheeses that’ll highlight their sweetness. Scatter toasted nuts and roasted pumpkin seeds in small piles to add crunch. Pro tip: Tossing apple/pear slices with a little lemon juice keeps them fresh-looking if you prep 15–30 minutes early.
- Add bread crackers and height (variety & accessibility) Fan crackers along one side or create a small stack in a corner — variety is visually appealing. Lean baguette slices upright against a cheese or place them in a small bowl to keep them crisp. Introduce height with small jars stacked crackers or a folded napkin under one section of the board.
- Final touches & styling (the pretty details) Drizzle a little honey over the brie or place a honey dipper in the ramekin. Garnish with fresh herbs (rosemary sprigs thyme) and a few edible flowers or thyme leaves for color. Add small labels or a note if you’re serving many guests (optional but helpful). Place serving utensils where they’re easy to reach and make sure there’s an empty plate or two nearby for guests. Pro tip: Warm brie option — if you want gooey crowd-pleasing brie preheat oven to 350°F (175°C) and bake the scored wheel for 10–12 minutes until soft but not bursting. Place it on the board immediately.
- Serving & storing leftovers (keep it fresh) Serve with small plates napkins and a set of knives so people don’t cross flavors. If the gathering lasts longer than a couple of hours refresh delicate items (cut more fruit replace soggy crackers). Store leftovers by wrapping cheeses separately in wax paper or airtight containers and refrigerate within two hours. Use leftover cured meats and cheeses within 3–5 days for best flavor and safety.
Notes
- Nutritional value per serving is approximate
- Ingredients can be adjusted for dietary preferences
- Warm brie option is a crowd favorite
- Refresh fresh items if the event lasts long for best taste
Nutrition
- Calories: 350 kcal
- Sugar: 10g
- Sodium: 650mg
- Fat: 24g
- Carbohydrates: 25g
- Fiber: 3g
- Protein: 12g

