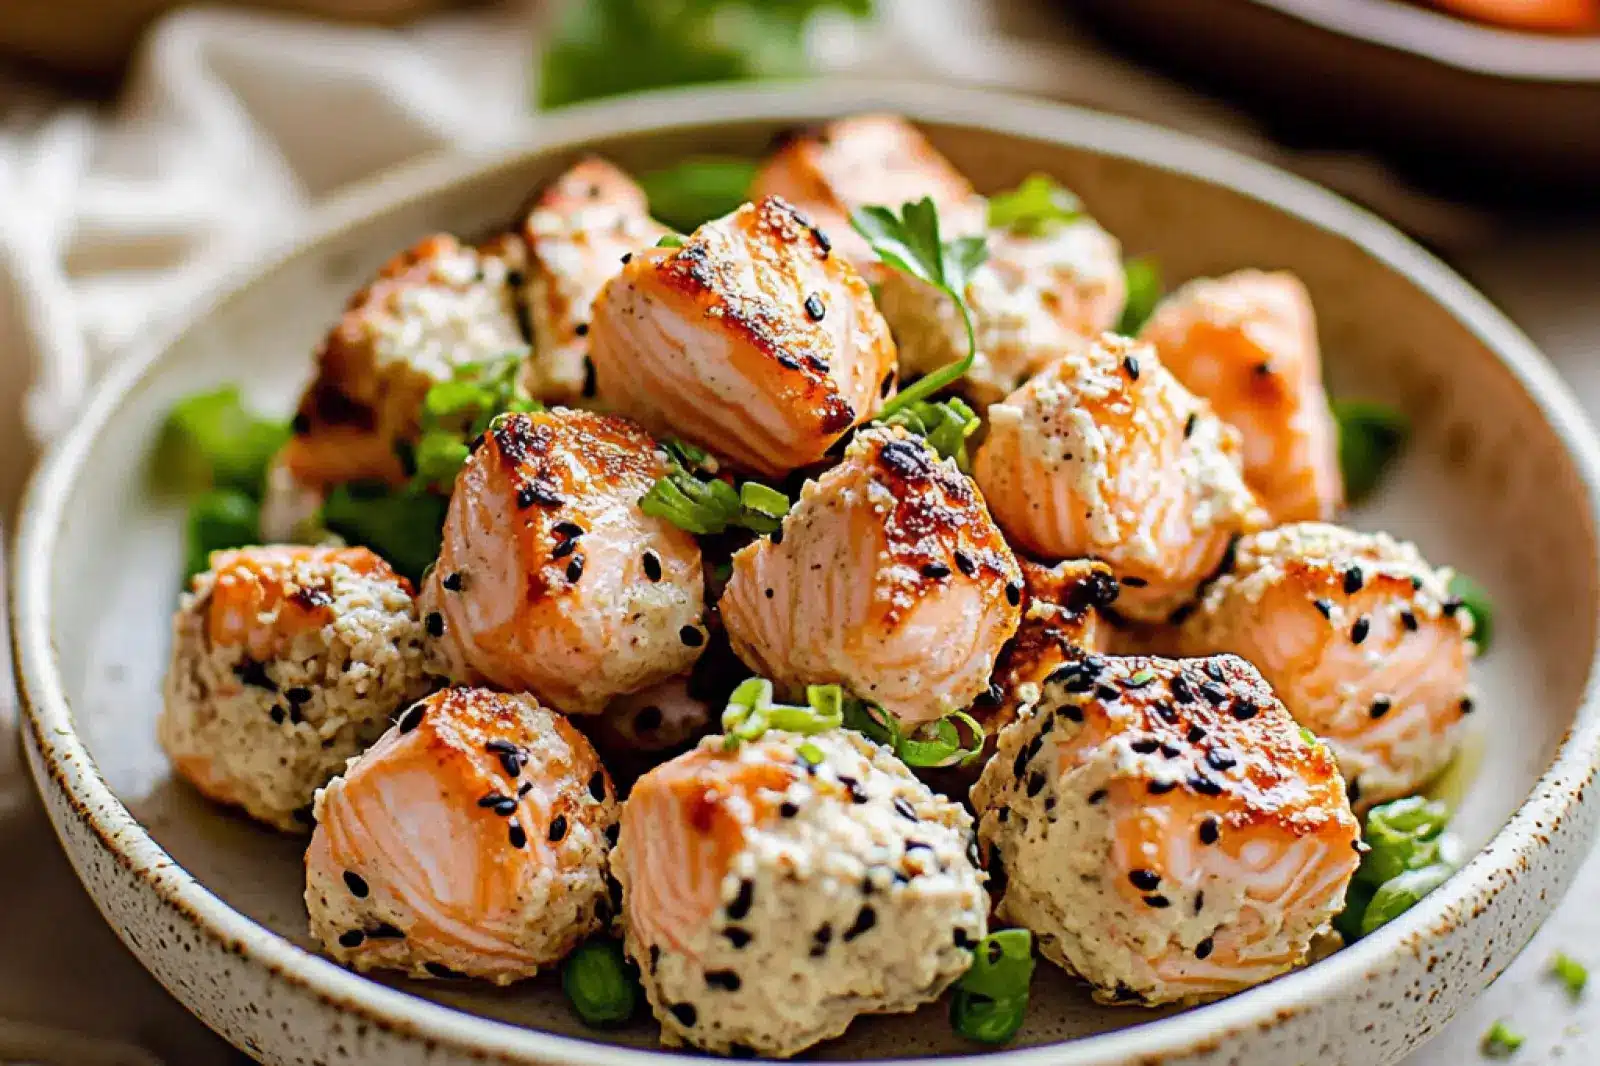
The sizzle of kielbasa hitting a hot oven always takes me back to Saturday game days when something simple needed to feed a crowd. These Mustard Hasselback Kielbasa Bites are exactly that kind of no-fuss party food that disappears fast. They’ve become my go-to when I need appetizers that actually satisfy people.
Think fancy hasselback potatoes but way easier and with smoky Polish sausage instead. You slice partway through each piece of kielbasa, brush with tangy mustard, and let the oven work its magic. The cuts open up like little accordions, getting crispy edges while staying juicy inside. Uses ingredients you probably already have, and they’re ready in under 30 minutes.
Started making these back in 2015 when I needed something hearty for my neighbor’s Super Bowl party. Everyone kept asking what made them so addictiveturns out it’s that mustard getting into every slice. The key I discovered? Don’t cut all the way through or they fall apart. My girls now request these for every family gathering, right alongside the veggie tray nobody touches.
PrintMustard Hasselback Kielbasa Bites For A Fun Party Snack

Mustard Hasselback Kielbasa Bites make a deliciously spicy and fun party snack. These Side Appetizers are perfect for Kielbasa Sliders lovers and are budget-friendly. Enjoy them as a tasty treat for any occasion.
- Prep Time: 10 minutes
- Cook Time: 8 minutes
- Total Time: 18 minutes
- Yield: 40 bites 1x
- Category: Appetizer
- Method: Air Fryer
- Diet: Standard
Ingredients
- 2 rings (13.9 ounces each) Kielbasa
- ¼ cup (62 g) course ground Dijon mustard
- 2 tablespoons apple cider vinegar
- 2 tablespoons light brown sugar
- 1 teaspoon Worcestershire sauce
- 2 tablespoons mayonnaise
- parsley chopped for garnish
Instructions
- Cut the Kielbasa into ¼ inch slices without slicing completely by placing chopsticks on each side to stop the knife.
- Then cut the sliced sausage crosswise into 1 inch bite-sized pieces, totaling about 40 bites.
- Mix mustard, apple cider vinegar, brown sugar, and Worcestershire sauce in a small bowl.
- Divide this mustard mixture into two parts.
- To one part, add mayonnaise and mix well to create the dipping sauce; refrigerate it while preparing the bites.
- Brush or pour about half of the remaining mustard sauce over the Kielbasa pieces, making sure the sauce reaches into the cuts.
- Arrange the pieces in a single layer in your air fryer basket and cook at 400°F for 7 to 9 minutes, shaking halfway through for even cooking.
- Remove the bites once browned, place them on a platter, and spread the leftover mustard sauce over them.
- Garnish with chopped parsley if desired and serve warm alongside the creamy dipping sauce.
Notes
- Preheat your oven to 425°F and line a baking sheet with parchment paper if air fryer is not available
- Prepare and arrange the Kielbasa pieces as directed, brush with mustard sauce, and bake for 18 to 20 minutes until golden
- Serve alongside the dipping sauce
Nutrition
- Serving Size: 1 Kielbasa bite
- Calories: 34kcal
Why These Mustard Hasselback Kielbasa Bites Work Every Time
There’s something magical about taking a simple ring of kielbasa and turning it into something that looks like you spent hours in the kitchen. The hasselback technique creates these beautiful accordion-style cuts that crisp up perfectly while keeping the inside juicy and smoky.
What makes these bites so addictive is how that tangy mustard sauce gets into every single cut. Each piece becomes like a little flavor pocket, and when you bite down, you get that perfect balance of sweet brown sugar, sharp Dijon mustard, and smoky sausage. It reminds me of those county fair sausages but way more elegant.
- Budget-friendly magic: Two rings of kielbasa feed a crowd of 8-10 people as appetizers
- Make-ahead friendly: Slice and sauce them hours before your party
- Kid-approved: Even picky eaters love these bite-sized pieces
Your Kitchen Tools and Key Players
The beauty of this recipe lies in its wonderfully simple ingredient list. You’ll likely find most of what you need already in your pantry! I certainly did the first time I prepared these for my book club.
The clever chopstick trick, a tip my mother-in-law shared for hasselback potatoes, is key here. By placing your kielbasa between two chopsticks or wooden skewers, they act as perfect guardrails, preventing you from slicing all the way through. This ensures beautifully even cuts every time, without accidentally cutting pieces in half.

| Ingredient | What It Does | Easy Swap |
|---|---|---|
| Kielbasa rings | The star – smoky, juicy base | Any smoked sausage works |
| Dijon mustard | Tangy flavor that gets in every cut | Whole grain or yellow mustard |
| Apple cider vinegar | Bright acidity to balance sweetness | White wine vinegar |
| Brown sugar | Caramelizes and balances the tang | Honey or maple syrup |
The Step-by-Step Magic
There’s something incredibly satisfying about the precision of the hasselback technique; it feels a bit like kitchen therapy! Watching those perfect little cuts fan out like tiny accordions is a treat. The key is to take your time with the initial slicing – once you find your rhythm, the process moves quite quickly.
Begin by positioning your kielbasa between two chopsticks and carefully slice down every quarter inch, stopping when your knife meets the chopsticks. Afterward, cut crosswise into bite-sized pieces; aim for about three rings per piece for that ideal pop-in-your-mouth size. (I learned the importance of this size after making them a bit too large for my first dinner party!)
- Pro tip: Make your mustard sauce first and divide it – half for coating before cooking, half mixed with mayo for dipping
- Don’t skip: Brushing with the reserved sauce after cooking adds that extra flavor punch
- Air fryer magic: 400°F for 7-9 minutes gets those edges perfectly crispy
Serving These Beauties
These bites shine when served on a large wooden board, accompanied by small forks and a bowl of creamy dipping sauce placed right at the center. They make perfect appetizers for game day or a satisfying starter when you need something hearty to fill guests before the main meal.
Their make-ahead friendly nature is ideal for parties: you can slice and sauce them hours beforehand, then simply pop them into the air fryer as guests arrive. The irresistible aroma alone will draw everyone into the kitchen, eager to know when they’ll be ready!
| Timing | What to Do | Storage |
|---|---|---|
| Up to 4 hours ahead | Slice, sauce, and refrigerate covered | Cover tightly with plastic wrap |
| Just before serving | Air fry and add final sauce | Serve immediately while warm |
| Leftovers | Reheat in air fryer 2-3 minutes | Refrigerate up to 3 days |
Make Them Your Own
Once you master the basic technique, these bites become your canvas for so many flavor combinations. Sometimes I add a sprinkle of everything bagel seasoning before cooking, or brush them with a honey-sriracha mix instead of the mustard sauce.
- Spicy kick: Add a dash of hot sauce to your mustard mixture
- Sweet and savory: Try maple syrup instead of brown sugar with a pinch of smoked paprika
- Holiday twist: Mix cranberry sauce into the dipping sauce for Christmas parties
Expert Says
The mustard in these Hasselback kielbasa bites not only adds bold flavor but also enhances moisture retention during cooking. The Hasselback technique increases surface area, promoting even caramelization and a satisfying crisp texture while keeping the sausage juicy inside, elevating both taste and mouthfeel.
For more delicious recipes and cooking inspiration, follow me on Facebook, Pinterest and Reddit!
The Journey to My Perfect Mustard Hasselback Kielbasa Bites
It took many playful attempts to get these mustard hasselback kielbasa bites just right. I remember the first time I sliced too deep and ended up with sausages tumbling apart, but through trial and error, I mastered the balance of crispy edges and tangy mustard glaze that my family now loves.
FAQs ( Mustard Hasselback Kielbasa Bites
)
How do I make the sausage crispy without drying it out?
To keep the sausage crispy yet juicy, slice it thinly but not all the way through. Brush lightly with mustard or oil before baking at 400°F, then roast until edges are golden. This lets heat reach inside without drying the meat, giving the optimal crisp texture overall.
Can I prepare this recipe ahead of time?
Yes, you can assemble the sausage bites a few hours before baking and store them covered in the fridge. When ready to serve, bake them fresh for the best flavor and texture. Avoid baking too early to keep the bites juicy and crisp when served.
What side dishes pair well with this dish?
This dish pairs nicely with simple sides like roasted veggies or a fresh green salad. For parties, include cheese, crackers, and pickles to create a sausage board vibe. These pairings balance richness with brightness for a tasty experience.
Absolutely! The savory and slightly tangy flavors make this a versatile appetizer or side for holiday menus. Its easy prep and festive look fit right in with Easter main dish ideas or Christmas meat appetizers, adding variety and crowd-pleasing taste.
Can I use different types of sausage?
Yes, you can substitute other smoked or fresh sausages depending on your preference. Just choose ones with firm texture to hold slicing well. Adjust cooking time slightly if using thicker or less fatty options for best results.

These Mustard Hasselback Kielbasa Bites come together in under 30 minutes and disappear even faster! You’ll love how those distinctive accordion cuts crisp up beautifully while keeping the kielbasa smoky and tender inside. The tangy mustard sauce seeps into every slice, creating perfect little flavor pockets that evoke memories of summer county fairs, but elegantly dressed for company.
Feel free to experiment: swap honey for brown sugar for an extra touch of sweetness, or add a dash of smoked paprika for deeper, more complex flavor. These bites reheat beautifully in the air fryer for about two minutesa handy trick I discovered after making a generous batch for book club! Serve them warm with additional dipping sauce and watch as guests gather around the platter, eager for the recipe.
I’d love to see your version of these delightful bites! Share a photo and tell me: do you have a go-to party appetizer that always gets devoured first? Save this recipe for your next gathering, or even better, prepare them this weekend just because. Sometimes the most comforting and delicious food moments happen when we’re not even entertaining.