If you’re anything like me, your sourdough starter is kind of like a needy pet—it requires feeding, attention, and a whole lotta love. But instead of just baking another crusty artisan loaf (yawn), how about we give that bubbly beauty a new mission in life? Let’s make sourdough hot dog buns!
Yep, hot dog buns. Soft, fluffy, slightly chewy, and full of that delicious tang only sourdough can bring. Whether you’re throwing a backyard BBQ, gearing up for a tailgate party, or just trying to impress your picky kid with a homemade lunch, these buns are about to become your new summer staple.
Let’s take this homemade adventure together—and don’t worry, no knead (see what I did there?) to be a pro baker.
What’s the Big Deal About Sourdough?
So why go through all the effort to make hot dog buns with sourdough? I mean, isn’t that just… extra?
Absolutely—and that’s the fun of it.
Sourdough has been around since ancient times, and for good reason. It uses wild yeast and bacteria from your environment (basically kitchen magic) to ferment the dough. This natural process brings:
- A flavor bomb: Tangy, rich, layered flavor you can’t get from store-bought bread.
- Better digestion: That fermentation process helps break down gluten and phytic acid, which makes it easier on your stomach.
- No commercial yeast: It’s all wild, baby!
- Longer shelf life: The acidity from fermentation naturally keeps your buns fresher, longer.
Oh, and one more thing—it’s seriously satisfying to bite into a bun that you made from scratch. Total kitchen hero moment.
Why Hot Dog Buns?
Most folks make sourdough boules or loaves. But let me tell you—once you try sourdough hot dog buns, there’s no going back.
They’re soft and fluffy, with just enough chew to hold up to your juiciest sausage. They toast beautifully, freeze like a dream, and they scream “I know what I’m doing in the kitchen.”
And let’s face it, they’re just plain cute.
Picture this: you’re at a BBQ, and you whip out homemade sourdough buns. Someone takes a bite and says, “Wait… did you MAKE these?” You nod modestly, as fireworks go off in the distance.
Okay, maybe not exactly like that—but close.
The Anatomy of a Great Sourdough Hot Dog Buns
Not all buns are created equal. A perfect hot dog bun has to check a few boxes:
Shape & Size
You want a bun that’s long enough to cradle a full dog (looking at you, footlong fans), but not so wide it feels like you’re eating a loaf. The ideal bun gently hugs the sausage, with a cozy space for toppings.
Crumb & Crust
A soft, slightly chewy crumb is essential. You’re not making a baguette here. The crust should be thin and golden, not too crunchy—just enough to hold its shape when grilled or steamed.
Flexibility
Ever bitten into a hot dog only for the bun to split and drop all your toppings? Nightmare. These sourdough beauties are tender but sturdy, like the denim jacket of the bread world.
Sourdough vs. Store-Bought: Flavor, Texture, Health
Let’s play a quick round of Bun Wars.
| Feature | Sourdough Hot Dog Buns | Store-Bought Bun |
|---|---|---|
| Flavor | Tangy, rich, layered | Mild, sweet, flat |
| Texture | Soft with a chew | Fluffy, often gummy |
| Shelf Life | 3–5 days w/o preservatives | 1–2 weeks (thanks to additives) |
| Health | Fermented, easier on digestion | Often packed with sugar and dough conditioners |
I’m not saying you’ll never go back to store-bought… okay, yes I am. Once you taste that real sourdough flavor wrapped around a smoky brat or veggie dog, you’ll wonder how you ever settled for squishy supermarket buns.
Ingredients You’ll Need for : Sourdough Hot Dog Buns
Let’s keep it simple—no weird flour from outer space or fancy tools required.
Here’s what you’ll need for around 8 buns:
| Ingredient | Amount | Notes |
|---|---|---|
| Active sourdough starter | 100g (about ½ cup) | Fed and bubbly |
| All-purpose flour | 400g (about 3⅓ cups) | Can sub 50g with whole wheat |
| Milk (or plant-based) | 180g (¾ cup) | Warm, not hot |
| Butter (or oil) | 45g (3 tbsp) | Softened or melted |
| Sugar or honey | 25g (2 tbsp) | Adds a hint of sweetness |
| Salt | 8g (1½ tsp) | Don’t skip it! |
| Egg (optional) | 1 | For brushing tops (shiny buns!) |
Lightly sweet, perfectly chewy, and with a tangy twist—that’s the flavor profile we’re building here.
Equipment & Prep Tips
Let’s not overcomplicate it. Here’s what you’ll want nearby:
| Tool | Use |
|---|---|
| Mixing bowls | For combining ingredients and fermenting |
| Kitchen scale | Accuracy = best buns |
| Bench scraper | Makes shaping buns a breeze |
| Baking tray | For that golden-brown finish |
| Parchment paper | Prevents sticking without a mess |
| Towel or plastic wrap | To cover dough during bulk fermentation |
| Oven with steam | A small pan of water will do—helps with soft crust during baking |
Pro tip: If your house is on the cooler side, proof your dough in the oven with the light on. Just don’t turn it on—we’re making buns, not toast.
Step-by-Step Recipe: The Bun Build
Time to roll up those sleeves and start baking.
🧪 Step 1: Feed That Starter
The night before you bake, feed your sourdough starter so it’s active and bubbly by morning. It should double in size and pass the “float test” (drop a spoonful in water—if it floats, it’s ready).
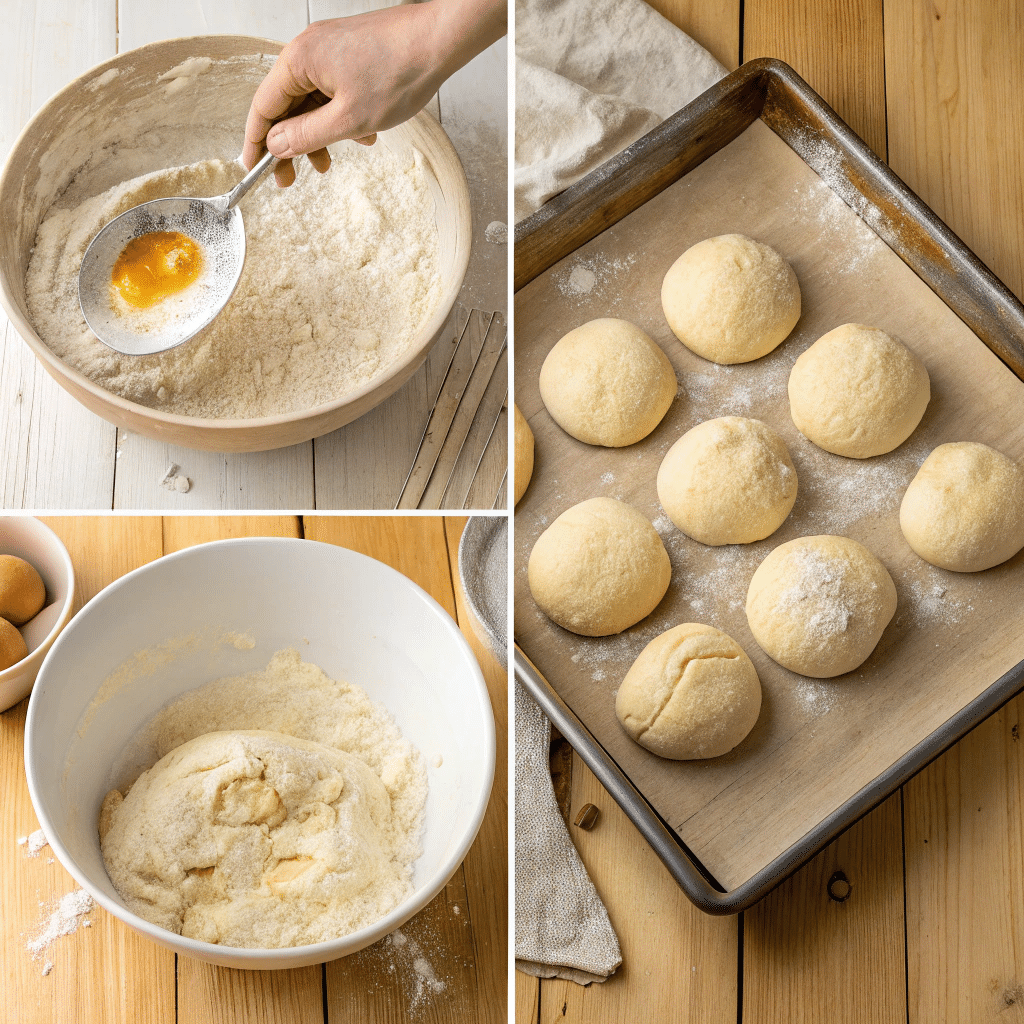
🌀 Step 2: Mix the Dough (Morning)
In a large bowl, combine:
- 100g active sourdough starter
- 180g warm milk
- 400g all-purpose flour
- 25g sugar or honey
- 45g butter
- 8g salt
Mix until a shaggy dough forms. Let it rest for 30 minutes (autolyse). This helps the flour absorb the liquid and start developing gluten.
💪 Step 3: Stretch & Fold
Every 30 minutes for the next 2 hours, perform a round of stretch-and-folds. Just pull one side of the dough and fold it over, turn the bowl, and repeat 3–4 times. Total of 3-4 rounds.
This helps build strength—think of it like giving your dough a gentle yoga session.
⏳ Step 4: Bulk Fermentation
Cover the dough and let it rise for 4–6 hours at room temp until it’s puffy and nearly doubled. If your kitchen is chilly, this might take a bit longer.
👩🍳 Step 5: Shape the Buns
Turn the dough onto a lightly floured surface. Divide into 8 equal pieces (about 100g each).
Gently flatten each piece, then roll it up into a log. Pinch the seam closed and place seam-side down on a parchment-lined tray.
Leave about 1 inch between buns so they puff up nicely but don’t fully stick together.
🌙 Step 6: Final Proof (Optional Overnight)
Cover and let the shaped buns rest:
- Option A: Proof at room temp for 2–3 hours until puffy.
- Option B: Refrigerate overnight (8–12 hours) for deeper flavor.
The overnight option makes morning baking a breeze!
🔥 Step 7: Bake
Preheat oven to 375°F (190°C). Brush tops with egg wash if you like shiny buns (who doesn’t?).
Place a small pan of hot water on the bottom rack for steam. Bake buns on the middle rack for 20–25 minutes, until golden brown.
Cool on a wire rack… if you can wait that long.
Visual Overview Table
| Step | Action | Time Needed | Notes |
|---|---|---|---|
| Feed Starter | Night before | ~5 mins | Must be active and bubbly |
| Mix & Autolyse | Combine ingredients + rest | 30 mins | Hydrate flour |
| Stretch & Fold | Every 30 mins, 3–4 times | 2 hours (total) | Builds gluten gently |
| Bulk Ferment | Covered, room temp | 4–6 hours | Until puffy |
| Shape | Divide & shape into logs | 15–20 mins | Keep sizes even |
| Final Proof | Room temp or overnight in fridge | 2–3 hrs or overnight | Until buns are puffy |
| Bake | 375°F with steam | 20–25 mins | Golden brown perfection |
Baking Tips & Troubleshooting
Even seasoned bakers run into a few bun blunders now and then. So if your first batch isn’t exactly bakery-worthy, don’t sweat it. Here’s how to sidestep the most common sourdough bun oopsies:
🫤 Problem: Buns are dense or heavy
Fix:
- You may have under-proofed the dough (a.k.a. didn’t let it rise enough).
- Your starter might not have been active enough—try feeding it more often or using it at peak rise.
😩 Problem: Buns spread out instead of up
Fix:
- Could be over-proofed or too much liquid.
- Try chilling the shaped buns for 30 minutes before baking to help them hold their shape better.
😕 Problem: Crust too hard
Fix:
- Skip the steam or brush with milk instead of egg.
- Cover buns with a tea towel right after baking to soften the crust.
😬 Problem: Gummy interior
Fix:
- Make sure your buns are fully baked! If they’re browning too fast on top, tent with foil and extend bake time by a few minutes.
Trust me, these little tweaks go a long way. And once you get it right? Chef’s kiss. 👨🍳
Flavor Variations & Fun Twists
Okay, so now you’ve mastered the classic. Ready to level up? Here are some fun ways to add a twist to your sourdough hot dog buns:
🌾 Whole Wheat Blend
Swap 20% of the white flour with whole wheat. You’ll get nuttier flavor and more fiber—plus a slightly rustic look.
🧄 Garlic & Herb
Mix 1–2 tsp of dried oregano, thyme, and garlic powder into the dough before bulk fermenting. Add some grated cheese on top for bonus points.
🧀 Cheddar Jalapeño
Add small cubes of sharp cheddar and sliced pickled jalapeños into the dough before shaping. Killer with spicy sausages.
🌱 Vegan-Friendly
Sub the butter with olive oil or vegan butter, and use plant milk. You won’t even miss the dairy.
Make-Ahead & Freezer Tips
Here’s the best part—these buns are totally meal-prep friendly.
🕰 Make-Ahead Options
- Do the bulk fermentation and shaping the night before, then let them proof in the fridge overnight.
- Bake fresh the next day for max flavor and convenience.
❄️ Freezer Tips
- After baking, let buns cool completely.
- Wrap individually in plastic wrap, then pop them in a zip-top freezer bag.
- To serve, thaw at room temp and warm up in the oven at 300°F for 5–7 minutes.
Bonus: Toast them on the grill cut-side down for those irresistible crispy edges.
Serving Suggestions: Not Just for Dogs 🐶
Sure, they’re technically hot dog buns… but don’t let the name limit your creativity.
Here are a few fun ideas:
| Serving Idea | Pair It With |
|---|---|
| Classic Dog | Mustard, ketchup, relish, and grilled onions |
| Bratwurst Party Bun | Sauerkraut, spicy mustard, pickled red cabbage |
| Vegan Sausage Roll | Field roast, arugula, sriracha aioli |
| Breakfast Bun | Scrambled eggs, cheese, and a sausage patty |
| Mini Sandwich Sliders | Pulled chicken, slaw, or meatball marinara |
Honestly, you might start making these buns for everything except hot dogs!
Expert Quote 💬
We love a good food quote—but this one comes with baking credibility:
“Sourdough isn’t just for crusty boules. The long fermentation adds a subtle complexity to soft breads like sandwich rolls and buns.”
— Maurizio Leo, author of The Perfect Loaf and sourdough guru.
Read more on his site
You heard the man—soft sourdough is where it’s at.
For more delicious recipes and cooking inspiration, follow me on Facebook, Pinterest and Reddit!
Nutritional Benefits Breakdown
Now, let’s be real—hot dog buns aren’t exactly green smoothies. But sourdough gives them a nutritional edge.
| Health Perk | Why It Matters |
|---|---|
| Easier to Digest | Sourdough fermentation breaks down gluten & phytic acid, making it gentler on your tummy. |
| Lower Glycemic Index | Won’t spike your blood sugar like white sandwich bread. |
| Natural Preservative Power | The lactic acid bacteria help the bread stay fresh longer without weird additives. |
| More Nutrients, Better Absorption | You’ll get more minerals like zinc, magnesium, and iron—and your body can absorb them better. |
Sourdough Hot Dog Buns
Soft, tangy, and just a little chewy, these sourdough hot dog buns will turn your next BBQ into a full-blown flavor party. Perfect for bratwursts, veggie dogs, or even breakfast sandwiches.
- Prep Time: 30 minutes (active)
- Cook Time: 25 minutes
- Total Time: 7–13 hours (depends on proofing style)
- Yield: 8 buns 1x
- Category: Bread
- Method: Fermented baking
- Cuisine: American
- Diet: Vegetarian
Ingredients
- 100g active sourdough starter (fed and bubbly)
- 400g all-purpose flour
- 180g warm milk (or plant-based alternative)
- 45g butter (or olive oil for dairy-free)
- 25g sugar or honey
- 8g salt
- 1 egg (optional, for brushing)
Instructions
- Feed Starter: The night before, feed your sourdough starter. Let it double.
- Mix Dough: Combine starter, milk, flour, sugar, salt, and butter. Mix until a shaggy dough forms. Rest 30 minutes.
- Stretch & Fold: Every 30 mins for 2 hours, do 3-4 stretch-and-fold sessions.
- Bulk Ferment: Let dough rise 4–6 hours until puffy.
- Shape Buns: Divide dough into 8 equal pieces. Roll each into a log and place on parchment-lined tray.
- Final Proof: Proof at room temp for 2–3 hours or refrigerate overnight.
- Bake: Preheat oven to 375°F (190°C). Optional: Brush tops with egg wash. Bake 20–25 mins.
- Cool & Serve: Let cool on a rack. Slice, toast, devour.
Notes
- For extra flavor, do an overnight cold proof after shaping.
- Want ultra-soft buns? Add a touch more milk to the dough.
- Add sesame seeds or poppy seeds on top before baking for that gourmet finish.
Nutrition
- Serving Size: 1 bun
- Calories: ~210 kcal
- Sugar: 3g
- Sodium: 240mg
- Fat: 6g
- Saturated Fat: 3g
- Unsaturated Fat: 3g
- Trans Fat: 0g
- Carbohydrates: 32g
- Fiber: 1g
- Protein: 5g
- Cholesterol: 20mg
🧠 FAQs: Sourdough Hot Dog Buns
Why are my sourdough buns coming out dense?
Probably under-proofed or your starter wasn’t at peak activity. Try giving your dough more time to rise and ensure your starter passes the “float test” (spoonful of starter floats in water = go time).
Can I make this recipe with whole wheat flour?
You bet! Start by swapping out 20–30% of the white flour with whole wheat. If you go 100% whole wheat, you’ll need to increase hydration a bit and expect a denser, heartier bun.
How do I store leftover buns?
Once cooled, store them in an airtight container at room temp for up to 3 days. For longer storage, freeze them (see freezer tips in Part 3).
Can I use discard instead of active starter?
Not really. Discard doesn’t have enough oomph to lift your buns unless you add commercial yeast. These buns rely entirely on natural fermentation power 💪
Can I double the recipe?
Yes, and I highly recommend it if you’re feeding a crowd! Just make sure to give your dough enough room to rise, and don’t rush the fermentation.
How do I know when they’re done baking?
They should be golden brown on top, sound slightly hollow when tapped, and register about 200°F (93°C) inside with a digital thermometer. When in doubt, give them 3 more minutes!
Conclusion
So, are sourdough hot dog buns more work than grabbing a pack from the store? Heck yes. But are they 100% worth it? Also heck yes.
You’re not just baking bread—you’re baking bragging rights. You’re crafting a backyard BBQ that people will remember. You’re turning a regular Tuesday lunch into a “wow, you made this?!” moment.
Whether you’re a sourdough newbie or a full-blown bread nerd, these buns are the ultimate crowd-pleaser. So get that starter fed, roll up your sleeves, and let the tangy magic begin.
Here’s to buns that rise to the occasion.






1 thought on “Sourdough Hot Dog Buns That Wow: A Homemade Adventure”