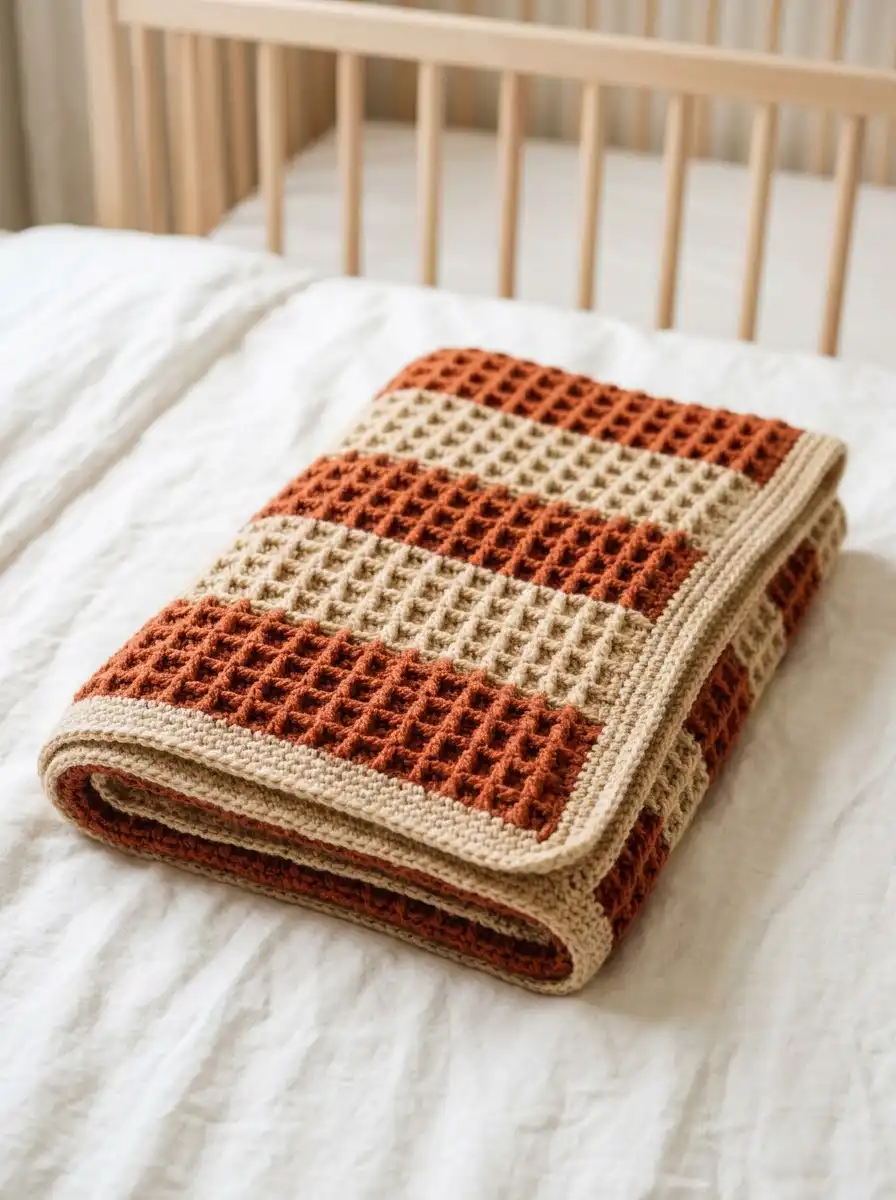
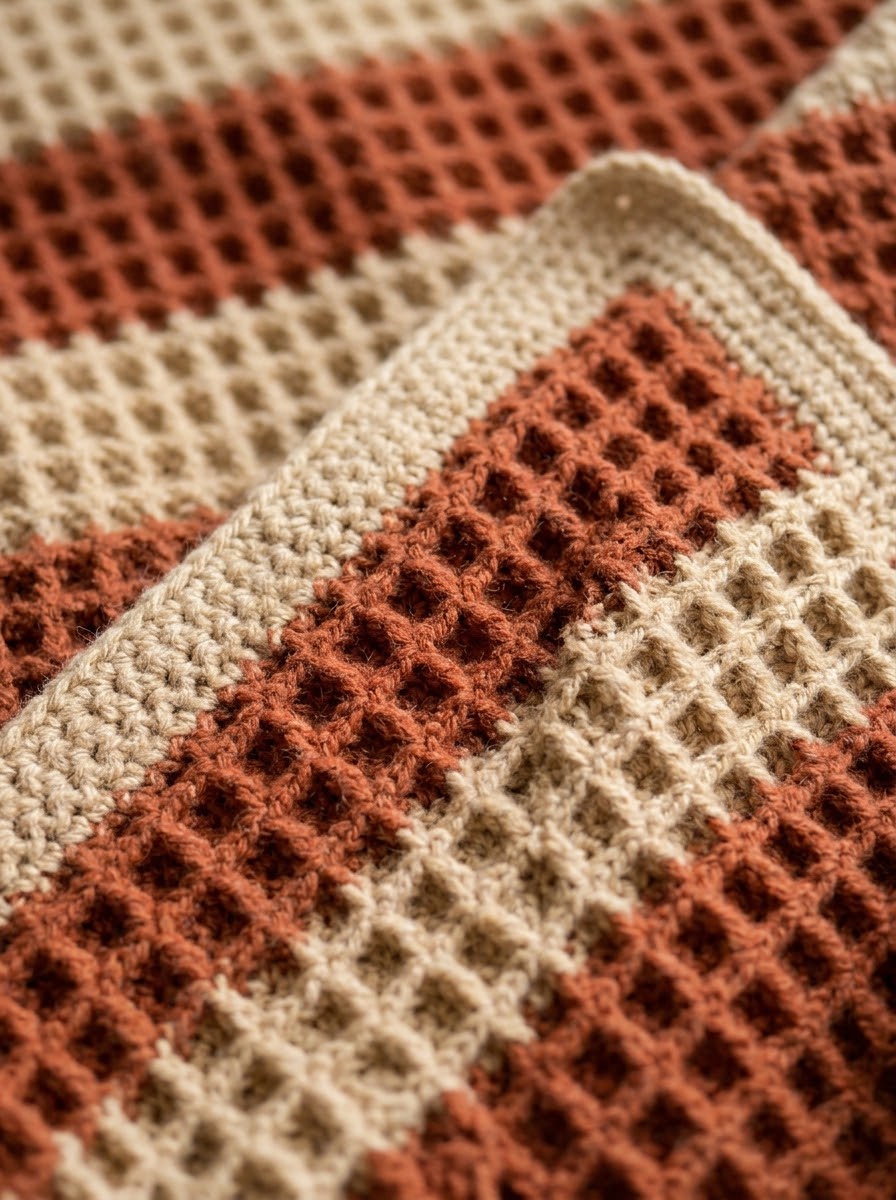
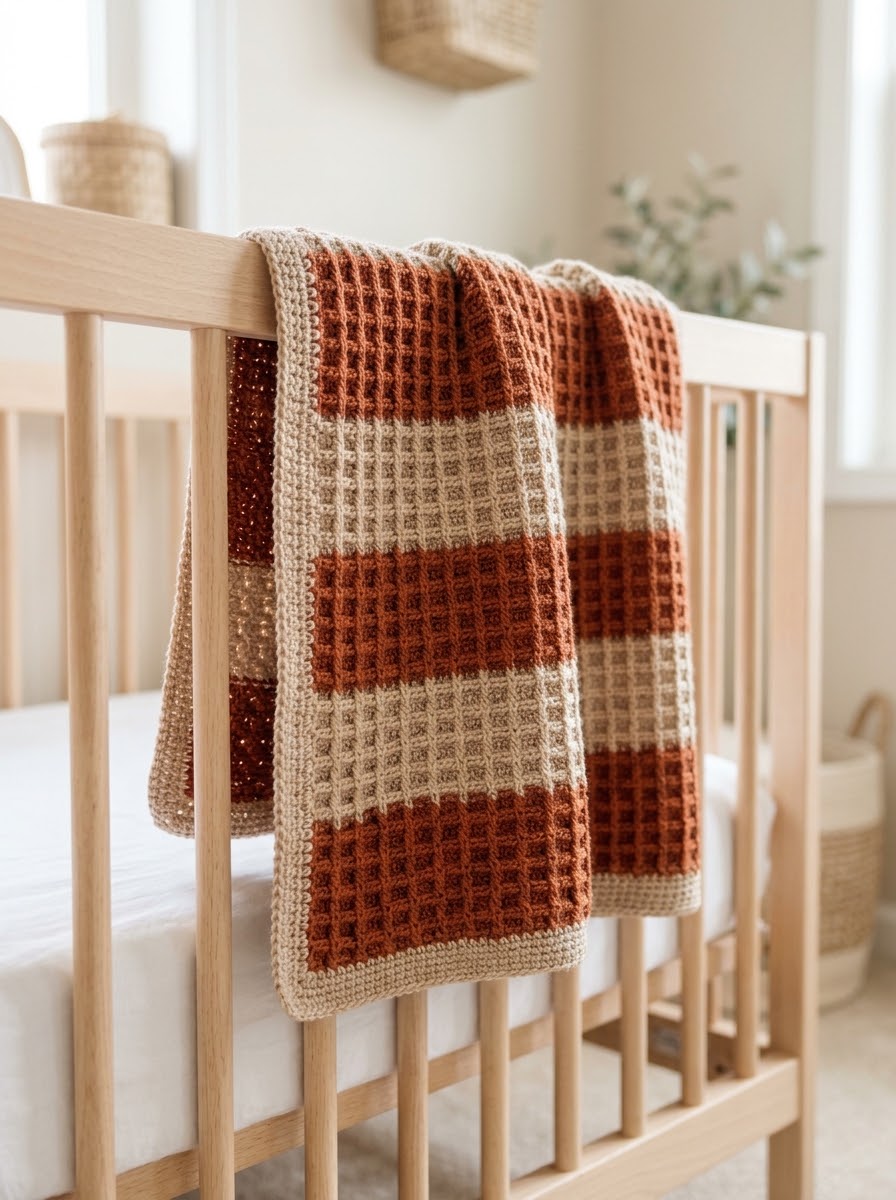
AI-generated illustration. Your blanket will differ: the real texture depends on your yarn and tension.
Easy pattern · stroller about 29 3/4 x 35 1/4 in or large about 35 3/4 x 44 1/2 in · worsted yarn in Rust and Sand, US I-9 hook.
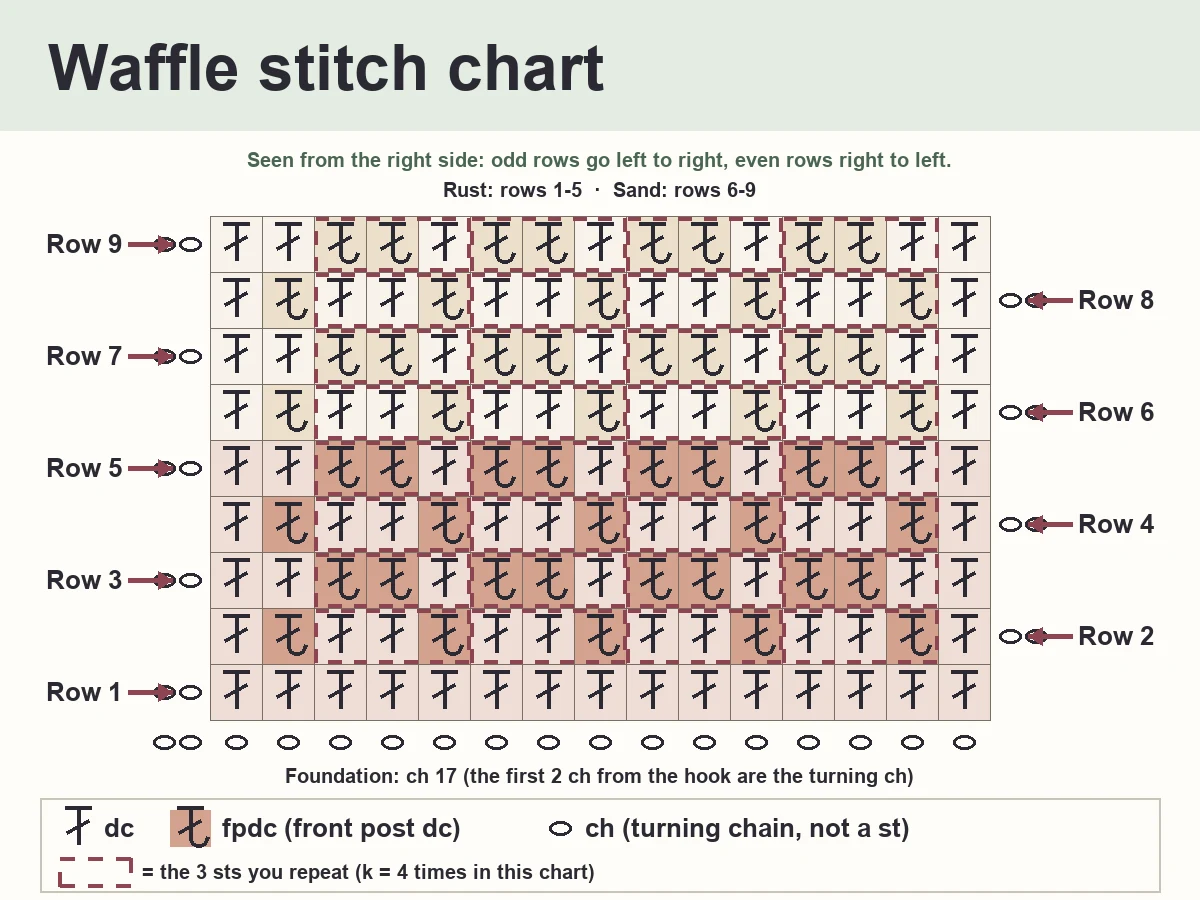
This waffle stitch baby blanket uses only two stitches: double crochet and front post double crochet (fpdc). Two rows repeat over and over, and the post stitches form a waffle grid on the fabric.
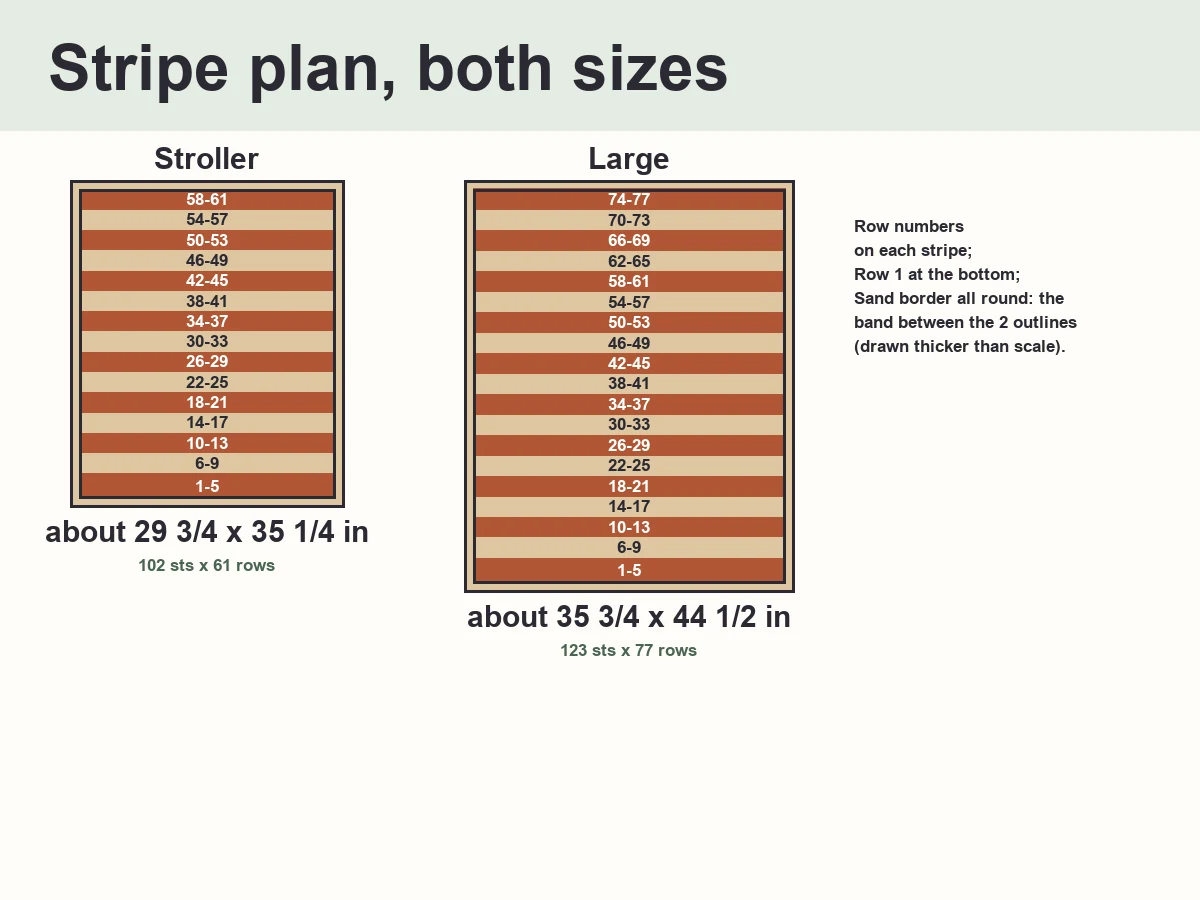
Each stripe is 4 rows (the first Rust stripe also holds Row 1, so it is 5), so you change color at the end of a row and never have to count in the middle of one.
Counts were checked by software. This pattern has not been crocheted and swatched by a person before publication. Sizes, yarn and time are estimates from a suggested gauge: make a swatch and adjust.
This blanket is for supervised use (stroller, play, cuddling). Do not leave it in a crib or bassinet with a sleeping baby: safe-sleep guidance says no loose blankets for babies under 12 months. Not a toy.
- Level
- Easy: ch, dc, fpdc and sc
- Time
- About 20 hours (stroller) or 31 hours (large), estimated, not timed
- Finished size
- Stroller about 29 3/4 x 35 1/4 in, large about 35 3/4 x 44 1/2 in (approximate)
- Yarn
- Worsted weight (#4), 2 colors: about 920 yd (stroller) or 1390 yd (large) in all
- Hook
- US I-9 (5.5 mm)
- Gauge
- Suggested only, not swatched: 14 sts and 7-8 rows = 4 in (10 cm) in waffle stitch. Rows may be shorter than we show, so measure your swatch and adjust the number of rows.
- Stitch multiple
- Chain a multiple of 3 + 2 (stitches = chain – 2, a multiple of 3)
- Length
- The length depends on your row gauge. The sizes above assume 7 rows = 4 in. With 8 rows = 4 in, the stroller is about 31 in long and the large about 39 in; add or remove 4 rows (one stripe) at a time to get the length you want.
Abbreviations (US)
- ch = chain
- sl st = slip stitch
- sc = single crochet
- dc = double crochet
- fpdc = front post double crochet
- st(s) = stitch(es)
- RS = right side
- WS = wrong side
- tch = turning chain (ch 2 here: never counted, never worked into)
- yo = yarn over
- k = number of times you do the bracket [ ]
Materials
- Rust (stripes): about 720 yd (large size)
- Sand (stripes and border): about 670 yd (large size)
- Yardage above is for the large size; the stroller is in the Sizes cards.
- Yarn needle, scissors, stitch markers.
- Pick a soft yarn whose label says it can be washed the way you will wash the blanket.
Stroller: about 29 3/4 x 35 1/4 in
- Yarn
- Worsted weight (#4), 2 colors: Rust and Sand
- Hook
- US I-9 (5.5 mm)
- Yarn needed
- Rust 480 yd · Sand 440 yd, about 920 yd in all (estimated, with a 20 % margin)
- Finished size
- about 29 3/4 x 35 1/4 in (75 x 90 cm), approximate. With 8 rows = 4 in the length is about 31 in.
- Counts
- Foundation ch 104; 102 sts per row (k = 33); 61 rows (15 stripes of 4 rows, the first one also holds Row 1). Border: 448 sc (100 sc along the top and the bottom, 2 sc in the end of each of 59 rows on each side, 3 sc in each corner). About 20 hours in all, estimated.
Large: about 35 3/4 x 44 1/2 in
- Yarn
- Worsted weight (#4), 2 colors: Rust and Sand
- Hook
- US I-9 (5.5 mm)
- Yarn needed
- Rust 720 yd · Sand 670 yd, about 1390 yd in all (estimated, with a 20 % margin)
- Finished size
- about 35 3/4 x 44 1/2 in (91 x 113 cm), approximate. With 8 rows = 4 in the length is about 39 in.
- Counts
- Foundation ch 125; 123 sts per row (k = 40); 77 rows (19 stripes of 4 rows, the first one also holds Row 1). Border: 554 sc (121 sc along the top and the bottom, 2 sc in the end of each of 75 rows on each side, 3 sc in each corner). About 31 hours in all, estimated.
Gauge and swatch
Notes
- US crochet terms: see the abbreviations above.
- Turning ch (ch 2): it does not count as a st. Work the first dc in the very first st and the last dc in the last st of the row, never in the turning ch.
- Fpdc: yarn over, insert the hook from the front, around the post of the stitch in the row below (the stitch right under your hook, the one you would work a dc into), and out to the front again. "Front" always means the side of the work facing you as you hold it. On a wrong-side row (odd rows) the post stitch therefore sticks out toward you on the wrong side. This is normal and is what makes the waffle. Yarn over, pull up a loop, then (yo, pull through 2 loops) twice. A fpdc takes the place of the dc you would have made in that st: do not skip a stitch behind a fpdc, and do not also work in the top of that st.
- Which stitch is it? Rows 2 and 3 both use fpdc. Row 2 (right side): fpdc around the 2nd st, then every 3rd st after it, so each fpdc sits between 2 dc. Row 3 (wrong side): 2 fpdc in a row, then 1 dc. Every fpdc goes around a dc of the row below (never a ch).
- Back bump: the bump on the back of each foundation ch, the side away from the V. Row 1 goes in the back bumps; the border later goes in the free loop (the V) of the same ch.
- [ ] times: do everything inside the brackets as many times as it says.
- Odd rows are the wrong side, even rows are the right side. You always insert the hook from the front of the work as you hold it, so on wrong-side rows the fpdc come toward you on the wrong side.
Waffle rows
Foundation, Row 1, then repeat Rows 2-3. Counts for both sizes are given in the Sizes cards.
- FoundationCh 104 (Stroller) or 125 (Large).Stitch count: 104 ch (Stroller) or 125 ch (Large)
- Row 1 (WS)Skip the first 2 ch from the hook (they are the turning ch and do not count as a st). Work a dc in the back bump of the next ch and of each ch across.Stitch count: 102 sts (Stroller) or 123 sts (Large)
- Row 2 (RS)Ch 2 (does not count as a st), turn. Dc in the first st. [Fpdc around the post of the next st, dc in each of the next 2 sts] 33 (Stroller) or 40 (Large) times. Fpdc around the post of the next st, dc in the last st. Do not work in the turning ch.Stitch count: 102 sts: 68 dc, 34 fpdc (Stroller) or 123 sts: 82 dc, 41 fpdc (Large)
- Row 3 (WS)Ch 2 (does not count as a st), turn. Dc in each of the first 2 sts. [Fpdc around the post of each of the next 2 sts, dc in the next st] 33 (Stroller) or 40 (Large) times. Dc in the last st. Do not work in the turning ch.Stitch count: 102 sts: 36 dc, 66 fpdc (Stroller) or 123 sts: 43 dc, 80 fpdc (Large)
- Rows 4 to the endRepeat Rows 2-3 (even rows = Row 2, odd rows = Row 3) until you have the number of rows in your size card. The last row is always an odd row (Row 3 type). Change color as in the stripe chart.Stitch count: 61 rows in all (Stroller) or 77 rows in all (Large)
Charts and plans
Stripes, row by row
| Stripe | Rows | Color |
|---|---|---|
| Stripe 1 | Rows 1-5 | Rust |
| Stripe 2 | Rows 6-9 | Sand |
| Stripe 3 | Rows 10-13 | Rust |
| Stripe 4 | Rows 14-17 | Sand |
| Stripe 5 | Rows 18-21 | Rust |
| Stripe 6 | Rows 22-25 | Sand |
| Stripe 7 | Rows 26-29 | Rust |
| Stripe 8 | Rows 30-33 | Sand |
| Stripe 9 | Rows 34-37 | Rust |
| Stripe 10 | Rows 38-41 | Sand |
| Stripe 11 | Rows 42-45 | Rust |
| Stripe 12 | Rows 46-49 | Sand |
| Stripe 13 | Rows 50-53 | Rust |
| Stripe 14 | Rows 54-57 | Sand |
| Stripe 15 | Rows 58-61 | Rust |
| Stripe | Rows | Color |
|---|---|---|
| Stripe 1 | Rows 1-5 | Rust |
| Stripe 2 | Rows 6-9 | Sand |
| Stripe 3 | Rows 10-13 | Rust |
| Stripe 4 | Rows 14-17 | Sand |
| Stripe 5 | Rows 18-21 | Rust |
| Stripe 6 | Rows 22-25 | Sand |
| Stripe 7 | Rows 26-29 | Rust |
| Stripe 8 | Rows 30-33 | Sand |
| Stripe 9 | Rows 34-37 | Rust |
| Stripe 10 | Rows 38-41 | Sand |
| Stripe 11 | Rows 42-45 | Rust |
| Stripe 12 | Rows 46-49 | Sand |
| Stripe 13 | Rows 50-53 | Rust |
| Stripe 14 | Rows 54-57 | Sand |
| Stripe 15 | Rows 58-61 | Rust |
| Stripe 16 | Rows 62-65 | Sand |
| Stripe 17 | Rows 66-69 | Rust |
| Stripe 18 | Rows 70-73 | Sand |
| Stripe 19 | Rows 74-77 | Rust |
Border
Sand, 1 round, right side facing.
- BorderFasten off the last color. Hold the blanket with the right side facing you and the last row at the top. Join Sand with a sl st in the top right corner st (the last st of the last row, looking at the right side), leaving a 6 in tail. Ch 1 (does not count as a st), 3 sc in the same st (corner). Sc in the top of each of the next 100 (Stroller) or 121 (Large) sts along the top (fpdc included). 3 sc in the next st (corner). Down the left side, 2 sc in the end of each of the next 59 (Stroller) or 75 (Large) rows (2 sc in the side of the end dc of that row, not in the turning ch), the top and bottom rows not included (they are the corner sts). Bottom edge: the 2 chains you skipped at the start of Row 1 stay unworked at this corner. Ignore them and work the corner in the ch under the first dc: 3 sc in the free loop (the V) of that ch (corner), then sc in the free loop (the V) of each of the next 100 (Stroller) or 121 (Large) ch, then 3 sc in the free loop (the V) of the ch under the last dc of Row 1 (corner). Up the right side, 2 sc in the end of each of the next 59 (Stroller) or 75 (Large) rows. Join with a sl st in the first sc. Fasten off. If the sides ripple (wave), you have too many sc: in every 8th row end work 1 sc instead of 2. If the sides pull in (cup), work 3 sc in every 8th row end instead of 2. Your sc count then changes by 1 for each such row end, so adjust the counts above. You can lightly block the finished blanket; follow the yarn label.Stitch count: 448 sc (stroller) or 554 sc (large)
Finishing
Check that every end is woven in and that the carried strands lie flat along the edge. Wash and dry the blanket as the yarn label says before you gift it. You can lightly block the finished blanket; follow the yarn label. This blanket is for supervised use (stroller, play, cuddling). Do not leave it in a crib or bassinet with a sleeping baby: safe-sleep guidance says no loose blankets for babies under 12 months. Not a toy.
Tips
- Put a stitch marker in the first stitch of every row so you can count quickly.
- To change the size, add or remove 3 stitches (and 3 ch in the foundation) at a time, or 4 rows at a time so the stripes stay whole.
- Keep the same tension on the post stitches: pulling them tight shrinks the width.
Common mistakes
- Working in the turning chain: the row gets 1 stitch too many.
- Skipping a stitch behind a fpdc: the row gets 1 stitch too few.
- Working a dc in the top of the stitch you went around with a fpdc: the row gets 1 stitch too many.
- Pulling the carried yarn tight: the edge puckers.
Make it your own
- Other colors: any two colors with good contrast keep the stripes clear.
- One color: skip the stripes, it is still a textured blanket.
- Bigger or smaller: use the tip above to change the size.
Care
- Follow the washing and drying instructions on the label of your yarn.
- This blanket is for supervised use (stroller, play, cuddling). Do not leave it in a crib or bassinet with a sleeping baby: safe-sleep guidance says no loose blankets for babies under 12 months. Not a toy.
More views
FAQ
Baby safety
Baby safety: this blanket is made for the stroller, the play mat and cuddles. For sleep, follow your pediatrician's safe sleep advice, and keep loose blankets out of an unattended baby's sleep space. Check that every end is woven in and that no strand or loop can catch a small finger.
© 2026 amgroyal.com. You may sell what you crochet. Please don't copy or repost this pattern; link to it instead.