If you’re diving into the world of artisan bread baking, chances are you’ve come across the term “stiff sourdough starter.” But what exactly is it? And how does it differ from the bubbly, pancake-batter-like starter most people are familiar with?
A stiff sourdough starter is simply a natural leaven made from flour and water, just like a regular starter, but with a much lower hydration level — which means less water. Instead of being pourable, it has a dough-like consistency. This small tweak dramatically changes the behavior, flavor, and applications of your sourdough culture.
Used extensively in European and especially Italian baking traditions, stiff starters are prized for their stability, sweeter flavor, and lower acidity. They’re often used in recipes that require long fermentation times or delicate crumb structures — think panettone, brioche, or baguettes.
So whether you’re an experienced baker or just a sourdough enthusiast looking to up your bread game, learning about stiff starters can add a new level of depth (and flavor!) to your baking repertoire.
Understanding Hydration Levels in Sourdough
What Does “Stiff” Mean in Baking?
In sourdough terminology, hydration refers to the ratio of water to flour in your starter or dough, measured by weight. A “stiff” starter typically has around 50-65% hydration, which makes it much thicker than a 100% hydration (liquid) starter. If you’ve ever mixed a dough and found it hard to stir or knead by hand, that’s the kind of consistency we’re talking about here.
In short:
- Liquid Starter = Batter-like (100% hydration or higher)
- Stiff Starter = Dough-like (50–65% hydration)
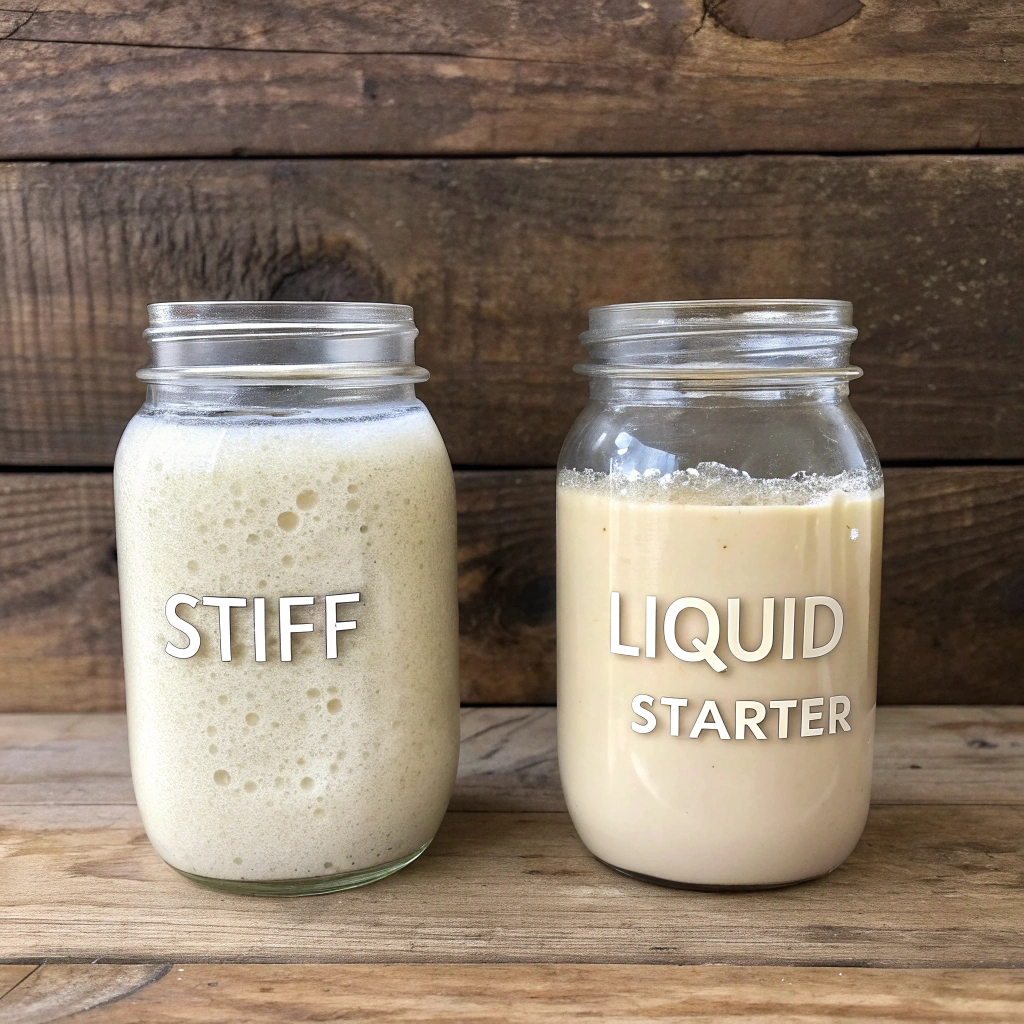
The word “stiff” refers to how the starter holds its shape, forming a ball rather than spreading out.
How Hydration Affects Fermentation
The amount of water in your starter doesn’t just affect how it looks and feels — it also changes how it ferments. Here’s why hydration matters:
- Less water = slower fermentation: Stiff starters ferment more slowly because yeast and bacteria move and reproduce faster in wetter environments.
- More control over flavor: Because fermentation is slower, there’s less buildup of acids — leading to a milder, sweeter flavor profile.
- Longer peak activity window: Liquid starters peak quickly, while stiff starters are more forgiving and stay viable longer before needing refreshment.
In essence, hydration is like the thermostat of your starter: adjust it to speed up or slow down fermentation, depending on your baking schedule and flavor goals.
Why Choose a Stiff Sourdough Starter?
Advantages Over Liquid Starters
You might be wondering, “Why go through the trouble of using a stiff starter when a liquid one seems easier to mix and maintain?” Great question. Here’s why many bakers — especially professionals — prefer the stiff version:
- More Flavor Control: Lower hydration reduces acid buildup, allowing the natural sweetness of the grain to shine.
- Extended Shelf Life: Stiff starters can often be stored for longer periods between feedings, especially in cooler climates.
- Easier to Transport: Because it’s firm, it doesn’t spill. Handy if you’re bringing it to a friend’s house or bakery.
- Better for Certain Breads: Stiff starters are often used in enriched or sweet breads like brioche, panettone, or croissants, where too much acidity can disrupt the dough’s structure or flavor.
- Slower Fermentation: Great for recipes that require long fermentation without the starter getting overly sour.
Best Recipes for Stiff Starter Use
Certain breads practically demand the use of a stiff starter. These include:
- Panettone: The rich Italian holiday bread requires multiple rises and a very mild starter.
- Ciabatta: While some ciabatta recipes use poolish, many traditionalists use a stiff starter for enhanced texture.
- Rustic country loaves: Get that deep, caramelized crust with subtle sourness.
- Brioche and enriched doughs: A stiff starter won’t overpower the butter, eggs, and sugar in your recipe.
Ingredients and Tools You’ll Need
Before you begin cultivating your stiff sourdough starter, you’ll want to gather a few essential tools and quality ingredients. This isn’t a complicated process, but precision matters — especially when you’re dealing with hydration ratios.
Choosing the Right Flour for a Stiff Starter
When it comes to flour, protein content is king. A higher-protein flour (like bread flour) provides more gluten structure, which is especially important for a stiff starter because it holds its shape more than a liquid one.
- Best Choices: Bread flour, all-purpose flour with a high protein percentage (11–13%), or a mix of white and whole wheat.
- Why it matters: Strong flour feeds the wild yeast and bacteria, allowing them to flourish while supporting a firm texture.
Avoid bleached flours or those treated with additives — they can disrupt fermentation and limit microbial activity.
Recommended Equipment for Accuracy
While you don’t need a professional kitchen, a few simple tools will make your life easier and help ensure consistent results:
| Tool | Why It’s Important |
|---|---|
| Digital Scale | Accuracy is critical for hydration control |
| Glass Jar or Container | Lets you monitor rise and fermentation activity |
| Dough Scraper | Helps mix and divide dough-like starter |
| Thermometer | Optional, but useful to keep track of fermentation temperature |
| Clean Spoon | Stirring and scooping |
| Rubber Band | Mark starter rise on the jar |
Pro tip: Keep a dedicated starter jar so you can track how much it rises and adjust feeding accordingly.
Step-by-Step: How to Create a Stiff Sourdough Starter from Scratch
Creating a sourdough starter from scratch is like nurturing a tiny, living ecosystem. A stiff starter takes a little more kneading and patience, but the rewards are well worth it.
Day 1–3: Developing Initial Fermentation
You’ll want to begin by encouraging wild yeast and bacteria to colonize your starter.
Day 1:
- Mix 60g whole wheat flour + 30g filtered water in a small bowl.
- Stir until a dry, shaggy dough forms — knead briefly with your fingers if needed.
- Place in a clean jar, press lightly, and cover loosely (with a lid or cloth).
- Let sit at room temperature (70–75°F / 21–24°C).
Whole wheat provides more nutrients and microbes than white flour, giving your starter a strong beginning.
Day 2:
- You may not see much activity — that’s okay!
- Discard half (about 45g) of the starter.
- Add 60g white bread flour + 30g water, mix and knead into a dough ball.
- Return to jar, mark level with a rubber band, and let rest.
Repeat once daily until you start seeing small bubbles or a slight rise.
Day 4–7: Feeding and Strengthening
By now, you should notice more bubbles, a pleasant tangy smell, and some volume increase.
Daily Feeding Routine:
- Discard all but 30g of the starter.
- Add 60g bread flour + 30g water (maintaining a 50% hydration).
- Knead gently to form a firm dough.
- Place in a clean jar and press it down.
- Let sit at room temperature or a warm spot.
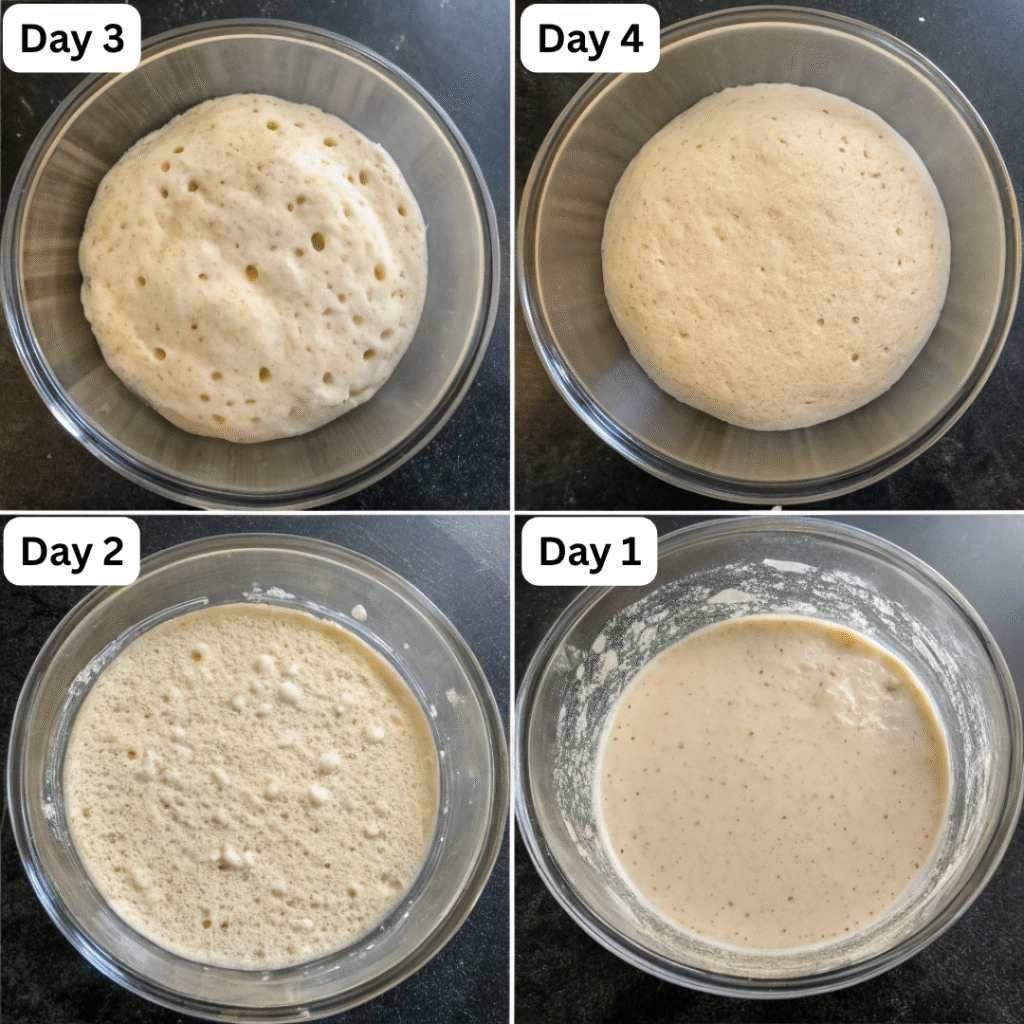
By Day 6 or 7, your starter should double in size within 6–8 hours and have a light, sweet-sour aroma. If so — congrats! You’ve created a healthy stiff sourdough starter.
If it’s still sluggish, continue feeding for a few more days. Remember, fermentation depends on temperature and flour quality, so patience pays off.
How to Feed and Maintain a Stiff Starter
Once your stiff starter is alive and active, the goal is to keep it strong without overfeeding or neglecting it.
Feeding Schedule and Ratios
Most bakers maintain their stiff starter using a 1:2:3 ratio (starter:water:flour by weight). For example:
- 20g starter
- 40g water
- 60g flour
This keeps it firm while still giving the microbes enough food. If you bake frequently, feed your starter once a day. If not, refrigerate it and feed once per week.
You can also switch to a 50% hydration mix (equal water to half the flour weight) for an even stiffer starter — ideal for long-fermenting doughs like panettone.
Troubleshooting Common Problems
Even with a stiff starter, things can go wrong. Here’s how to handle some common issues:
| Problem | Possible Cause | Solution |
|---|---|---|
| Starter isn’t rising | Low temperature, old flour, weak yeast | Warm the environment; switch to fresher flour |
| Bad smell (rotten, cheesy) | Unhealthy microbial balance | Discard, refresh frequently with clean tools |
| Crust forming on surface | Too dry or exposed | Cover tightly or mist with water before sealing |
| Too sour | Overfermented; high acid build-up | Feed more often or use in cooler conditions |
How to Convert a Liquid Starter into a Stiff Starter
Already have a bubbly, active liquid sourdough starter and want to switch it to a stiff version? Good news — you don’t have to start from scratch. You can easily transition your existing starter to a stiff one using one of two methods: gradual hydration reduction or immediate conversion.
Gradual Hydration Reduction Method
This is the most gentle and consistent way to convert your starter. It helps preserve microbial balance while adapting it to a drier environment.
Step-by-Step Process:
- Start with your active liquid starter.
- Feed it at a lower hydration than usual — start with 80% hydration.
- Over the next 3–4 feedings, reduce water gradually (e.g., 75%, 70%, 65%…).
- Once you reach 50–60% hydration, maintain that level going forward.
- Within a week, you’ll have a fully adapted stiff starter.
This method works best if you want to preserve your starter’s flavor and behavior while shifting its texture.
Immediate Conversion Approach
This method is quicker and works well if you’re in a hurry or don’t mind slight microbial fluctuations.
How to Do It:
- Take 30g of your liquid starter.
- Add 60g flour + 30g water (a 50% hydration feeding).
- Mix into a stiff dough ball and let ferment.
- Feed daily at the same hydration until it consistently doubles in volume.
Note: You may notice a temporary dip in activity or change in smell, but that usually resolves within 2–3 feedings.
Flavor Profiles: What to Expect from a Stiff Starter
One of the biggest reasons bakers use a stiff starter is to fine-tune the flavor profile of their bread. Hydration affects acidity, and acidity affects taste. Lower hydration = less sourness.
Acetic vs. Lactic Acid Balance
Sourdough flavor is largely influenced by the balance between two main acids:
| Acid Type | Flavor | Common in | Caused By |
|---|---|---|---|
| Lactic | Mild, creamy | Stiff starters | Slower, cooler fermentation |
| Acetic | Sharp, vinegary | Liquid starters | Fast, warm fermentation |
A stiff sourdough starter tends to produce more lactic acid, resulting in a smoother, more mellow flavor. This makes it perfect for:
- Sweet or enriched breads where too much sourness clashes with sugar or butter
- Subtle-flavored loaves where you want the grain to shine
You’ll also notice a difference in aroma — think yogurt-like tang instead of harsh vinegar.
Stiff Starter in Artisan Baking
Stiff starters have long been favored in traditional European baking, especially in recipes requiring precise control over fermentation.
Famous Breads Using Stiff Starters
Here are some well-known bread types and baked goods that benefit from stiff starters:
- Panettone (Italy): This rich, buttery Christmas bread demands a mild-flavored, highly stable stiff starter to avoid collapsing during long rises.
- Pandoro (Italy): Another sweet holiday bread that thrives on subtle fermentation.
- Ciabatta: Using a stiff starter can enhance the crumb structure while keeping sourness low.
- Brioche: Stiff starter ensures a buttery, melt-in-your-mouth texture without over-acidity.
- Pain de Campagne (France): Rustic French country bread with a well-balanced flavor.
Professional bakers love stiff starters because they give greater predictability during long fermentation periods — perfect for artisan baking where every detail counts.
Travel and Storage Tips for Stiff Starters
One of the perks of a stiff sourdough starter is its durability. Thanks to its low hydration level, it stays fresher longer, is easier to transport, and can survive short periods of neglect — making it the ideal companion for bakers on the go or those who don’t bake every week.
Long-Term Dormancy Techniques
When you don’t plan to bake for a while, you’ll want to put your stiff starter into hibernation mode. There are several effective methods to safely store your starter for weeks or even months without daily feedings.
1. Refrigeration (Short-Term Storage)
If you bake at least once every 1–2 weeks, refrigeration is perfect:
- Feed your stiff starter as usual (1:2:3 ratio).
- Let it sit at room temperature for 2–3 hours to activate.
- Then, seal the container and place it in the fridge.
- Feed once a week to keep it active.
Pro tip: Stiff starters refrigerate better than liquid ones because there’s less water to encourage spoilage.
2. Freezing (Medium-Term Storage)
Need a longer break? Freeze it:
- Feed the starter and let it rise.
- Divide into small portions and wrap tightly in plastic wrap or airtight bags.
- Freeze for up to 3 months.
- To reactivate, thaw at room temperature, feed, and continue daily refreshment for 2–3 days.
3. Drying or Dehydrating (Long-Term Storage)
This is the most stable method and ideal for backup:
- Flatten small portions of your stiff starter on parchment paper.
- Let it air dry completely for 24–48 hours, then crumble into flakes.
- Store in an airtight jar in a cool, dark place.
- It can last indefinitely when dried properly.
Reviving a Dormant Stiff Starter
Bringing a hibernating or sluggish starter back to life is easier than you think. Here’s how to reactivate it depending on how it was stored.
From the Refrigerator:
- Remove from fridge and let it warm up.
- Discard all but 30g of the starter.
- Feed with 60g flour + 30g water (50% hydration).
- Let it ferment at room temp (21–24°C or 70–75°F).
- Repeat for 1–2 days until it doubles consistently.
From the Freezer:
- Thaw a portion at room temperature.
- Follow the same feeding instructions as above.
- It may take 2–4 feedings before it becomes fully active again.
From Dehydrated Flakes:
- Mix flakes with equal parts warm water.
- Let them sit until fully rehydrated (2–4 hours).
- Add flour and knead into a stiff dough.
- Feed daily until it becomes bubbly and rises.
Remember: your starter is alive, and like any living thing, it just needs warmth, food, and care to bounce back.
Frequently Asked Questions (FAQs)
What’s the difference between a stiff and a liquid starter?
A stiff starter has less water, making it firmer and slower to ferment, while a liquid starter is more active and sour due to higher hydration. Stiff starters are easier to control and have a milder flavor.
Can I bake all breads with a stiff starter?
Yes, though some recipes may require adjusting hydration levels in your dough. Stiff starters work best for enriched or subtly flavored breads, while liquid starters are ideal for tangy, open-crumb loaves.
How often should I feed my stiff sourdough starter?
If kept at room temperature, feed once a day. If stored in the refrigerator, once a week is sufficient.
Can I store it at room temperature?
Yes, but you must feed it daily to keep it healthy. Room temp storage is ideal if you bake often.
Why isn’t my stiff starter rising?
This could be due to low temperatures, poor-quality flour, or an underfed starter. Try moving it to a warmer spot and feed it with fresh, unbleached bread flour.
How do I know if my starter has gone bad?
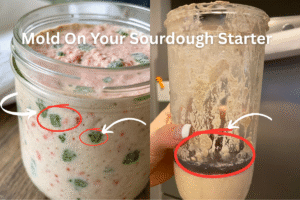
Signs include foul odors (like rotten meat), mold on the surface, or black liquid (hooch) that smells off. A healthy starter should smell mildly tangy, yeasty, or like yogurt.
Advanced Uses of a Stiff Sourdough Starter in Baking
Once you’ve mastered maintaining your stiff sourdough starter, it opens the door to a whole new level of artisanal baking. These starters are revered in classic European baking for their ability to deliver nuanced flavor, long fermentation tolerance, and structural stability.
Ideal for Long-Fermentation Recipes
Stiff starters are slower to ferment, making them perfect for doughs that rise over 12 to 48 hours. This longer timeline allows for:
- Better gluten development
- More complex flavor profiles
- Improved digestibility
- Enhanced crust and crumb quality
You’ll find stiff starters used in recipes like:
- Pain au levain (French sourdough)
- Panettone (Italian holiday bread)
- Kamut or spelt sourdough
- Miche (country-style loaves)
- Naturally leavened baguettes
Their predictable rise rate helps bakers plan production without worrying about over-proofing.
Famous Breads That Use a Stiff Sourdough Starter
1. Panettone
This luxurious Italian Christmas bread relies on a lievito madre, which is a stiff starter kept at around 45–50% hydration. It ensures the dough remains mild, slightly sweet, and able to support all that butter, eggs, and candied fruit.
- Why stiff starter works: Liquid starters can break down the dough, leading to collapse. A stiff starter provides stability and mild acidity for optimal fermentation.
2. Pandoro
Another festive Italian bread, Pandoro is like a soft, golden cake. It has delicate flavors and a fluffy crumb — both of which benefit from a low-acid starter.
- Stiff starter impact: Supports sweet notes and high-fat content without sour interference.
3. Rustic Country Loaves
Country-style sourdough loaves benefit from the deep, nutty flavor that a stiff starter brings — especially if you’re working with whole grains like rye or einkorn.
- Why it matters: You’ll get a chewy, moist crumb with a beautiful open structure and just a hint of tang.
4. Baguettes au Levain
A traditional French baguette made with a stiff starter has a crackly crust, open crumb, and a subtly sweet interior — no commercial yeast required.
- Starter advantage: Allows for precise shaping and scoring with minimal dough degradation.
5. Sourdough Brioche
With its rich, buttery flavor, brioche demands a very mild starter. A stiff one allows the dough to ferment slowly and gently, preserving structure.
- End result: Light, airy interior with that rich, satisfying crumb.
Texture and Crumb Benefits of Using a Stiff Starter
Hydration doesn’t just affect flavor — it dramatically influences dough handling and final bread quality.
| Dough Trait | With Stiff Starter |
|---|---|
| Gluten Strength | More elastic, less sticky |
| Crumb Texture | Creamy, slightly chewy |
| Crust Quality | Crisp and deeply caramelized |
| Dough Stability | Less prone to collapse |
| Oven Spring | Often better due to stable fermentation |
Using a stiff starter also reduces enzyme activity, which helps prevent the dough from breaking down too quickly — a common issue in very wet sourdough formulas.
Enhancing Bread Flavor with Stiff Starters
While sourdough is known for its signature tang, not every baker wants their bread to taste like vinegar. Here’s where a stiff starter shines.
Flavor Profile Benefits:
- Milder Acidity: Less vinegary, more creamy or nutty tones
- Complex Aroma: Yogurt-like or fruity scent from lactic acid
- Balanced Taste: Ideal for pairing with sweet or savory toppings
This makes stiff starters perfect for sandwich loaves, breakfast breads, or any recipe where you want subtle fermentation character.
For more delicious recipes and cooking inspiration, follow me on Facebook and Pinterest!
Conclusion: Embrace the Art of Stiff Starters
There’s something deeply rewarding about baking with a stiff sourdough starter. It’s more than just flour and water — it’s a living, breathing part of your kitchen that adds richness, texture, and soul to your bread.
From the milder flavor to the extended fermentation control and the beautiful texture it brings to artisan loaves, a stiff starter opens doors to creative possibilities in baking. Whether you’re whipping up a delicate panettone or crafting a rustic, chewy miche, this type of starter delivers precision and flavor that liquid ones sometimes can’t match.
So go ahead: build your own stiff starter, nurture it, experiment with it, and let it guide your baking to new heights. Once you’ve experienced the beauty of a slow-fermenting, sweet-scented dough, you’ll wonder how you ever baked without it.
PrintStiff Sourdough Starter (Levain Rigide)
Learn how to make a stiff sourdough starter from scratch with just flour and water. Perfect for brioche, panettone, or rustic sourdough breads, this firm starter develops deep flavor and strong fermentation power — ideal for artisan baking at home.
- Prep Time: 10 minutes
- Cook Time: 7 days ( fermentation )
- Total Time: 168 hours 10 minutes
- Yield: 1 starter (about 200 g) 1x
- Method: Baking
- Cuisine: Artisan Baking
- Diet: Vegan
Ingredients
- 60g whole wheat flour (for Day 1)
- 30g filtered lukewarm water (for Day 1)
- 60g white wheat flour (T65 or T80) (for Days 2–7)
- 30g filtered water (for Days 2–7)
Instructions
Day 1
-
Mix 60 g of whole wheat flour with 30 g of lukewarm filtered water in a clean glass jar.
-
Knead into a firm dough (consistency of modeling clay).
-
Loosely cover and let ferment at room temperature (70–75°F / 21–24°C).
Days 2–3
-
Discard half of the starter.
-
Add 60 g white flour + 30 g filtered water.
-
Knead by hand into a stiff dough.
-
Place back in the jar and loosely cover.
-
Repeat once daily.
Days 4–7
-
Continue daily feedings with the same ratio.
-
Your starter should double in volume in 6–8 hours and develop a tangy, yogurt- or fruity-like aroma.
Notes
- You can swap white flour for rye flour in the first days to boost fermentation.
- Stiff starters are ideal for enriched doughs like panettone, brioche, or rustic country breads.
Nutrition
- Calories: 180 kcal
- Sugar: < 0.5 g (naturally occurring)
- Sodium: 1 mg
- Fat: 1 g
- Carbohydrates: 35 g
- Fiber: 2 g
- Protein: 6 g
Want to take your sourdough skills further? Start with our complete guide: 7 Essential Steps to Mastering Your Sourdough Starter.
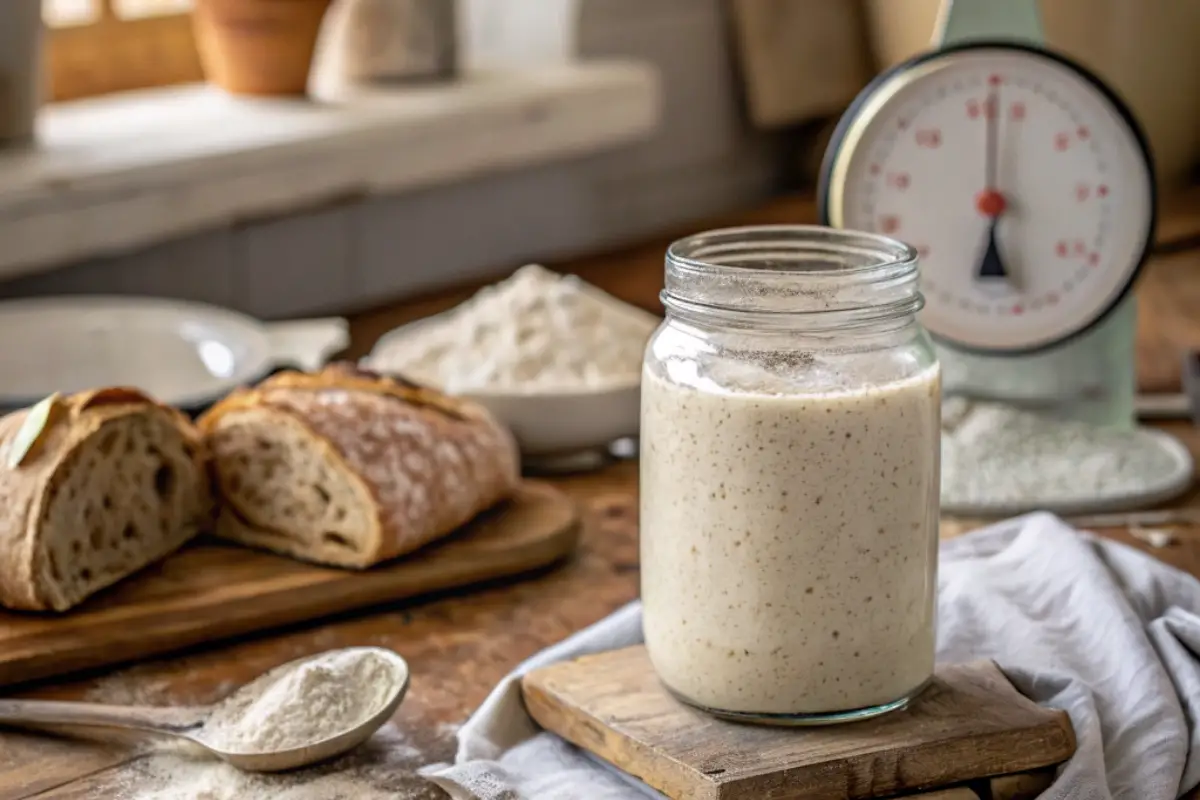
If you’re wondering what a ready sourdough starter should look like or simply how it looks at different stages, we’ve got you covered. You’ll also learn how to feed your starter when it’s in the fridge, how to spot and fix mold issues, and the difference between a liquid starter and a stiff sourdough starter.





4 thoughts on “What As A Stiff Sourdough Starter ?”